Monday, November 29, 2010

Kaleidoscope Card

Now that I'm organized, I have been creating up a storm lately.  I'll be sharing some holiday cards later in the week, but first, it's time for Paul's annual birthday card.  At the Club Scrap retreat, I learned a new technique that they called "Pinpoint Rotation."  This is the result of that technique:

The "happy birthday" is mounted on some foam tape, which results in a little bit of distortion on the scan. The stamp is from Teeny Tiny Wishes and the coordinating punches (Word Window and Modern Label) are from Stampin' Up! - one of my favorite and most versatile greeting sets.

Believe it or not, I used one stamp and one ink pad to make the design on the cream colored paper.  That stamp isn't available anymore (Solstice Club Stamp kit), but check out this image from a different stamp.  To replicate this technique, you will need a:
  • Stamp - border stamps work particularly well
  • Stamp positioner, like a stamp-a-ma-jig or a Position It (I'll be talking more about the Position It later - this is a fabulous tool)
  • Ruler and pencil
  • Mulitcolored ink pad - I used the Kaleidacolor ink pad Fiesta
Nobody shows this better than Tricia, so check her out demonstrating the technique, and see where your imagination takes you!  I love this technique!


Some cool tools I used in this post:
   

Wednesday, November 10, 2010

The End: Are you organized yet?

After purging lots of supplies (4 boxes and 4 grocery bags full), reorganizing my space, storing my rubber stamps, and storing my dies, I've made a lot of progress.

But, it's never done.

New stuff arrives on a monthly basis (I love those Club Scrap kits!), and who can resist a purchase at the local scrapbook store?  I got some great gemstones, fall leaves, and a pen there this weekend.

So, why do I continue to purchase more, when I have plenty?  I've come up with a few guidelines to guide future purchases and help answer the question - should I really buy this?

  1. Replacing tools.  I use my black marker for a lot of journalling, and it's dry.  It's ok to buy a new black marker, because I'll get rid of the old one that doesn't do the job anymore. 
  2. Purchasing basics.  The gemstones were an item that I previously had and used up.  These are basic, and I still like them.  A little sparkly item goes a long way.   I also stock up on adhesive, since it's cheaper to buy ATG adhesive in bulk.
  3. Buying special items.   The leaves aren't something I need, but they fit in my style.  When I saw these, I could see them fitting on scrapbook pages, and cards that I'd like to make for Thanksgiving.
  4. Inspiring me.  My Club Scrap kits provide a monthly spark to my imagination.  If something sparks your imagination, it could be worth the purchase price just for that reason.
How will I fit these items in my home and continue to stay organized?  This is what I'm thinking...
  1. Go up!  My husband saw an opportunity for me to have more shelves in my room.  We'll be installing those shortly to provide much needed storage space for my finished scrapbooks.
  2. Purge as I go.  When a new item comes in, it either needs to fit in the space I have, or something else has to go.  I put these items in a box upstairs.  When the annual rummage sale time comes around, I can sell them, or put them back in my stash if I've changed my mind.
  3. Keep a clean desk.  I did this in the summer for a while, and what a difference it made! After a project is done, I'm going to clean my desk.  If the desk is clean, it's more inviting to work there, and provides room to sort and store new items as needed.
What guides your papercrafting purchases?  How do you stay organized?  What do you continue to struggle with in your craft space?  It's great to share ideas!  Hope you enjoyed this series.  Now that I'm organized, I can go back to crafting!

Sunday, November 07, 2010

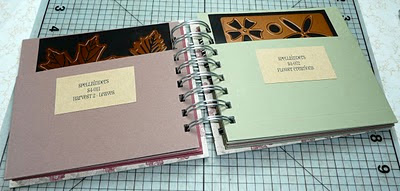
Organization tip #4: Spellbinders storage plus tutorial

I love spellbinders dies, especially the nestability dies.  These dies come in basic (and complex) shapes in a variety of nesting sizes.  I like to make my own bind-it-all binders to store these dies.  They're trim, easy to make, and group my dies into nice categories.

First, I got all my dies out, and decided which dies would fit in which book.  This book is all about shapes - leaves, flowers, santa, bridge, etc.  I'll be using a bind-it-all, cardstock, scor-it, patterned paper, a cutting mat, and a craft knife for my initial supplies.

To make the pockets, I take a 8.5 x 11 piece of paper and score it at 5.5" with the paper in a landscape orientation.

Rotate the paper 90 degrees so it is in a portrait orientation, and score at 5".

Fold the long edge up to form the pocket part.  Reinforce the fold with a bone folder.

Fold the paper on the other score line.  The folded edge will be on the outside of the book, while the open edge will be the binding edge.

Next, I make the covers.  Trim two pieces of chipboard to 5.75 x 5.25" using a craft knife, and cutting mat.  I choose thinner chipboard for this project - you'll be covering it with patterned paper and punching holes in it later.

Trim a 12 x 12 piece of paper into two 6 x 12 pieces.  Run each piece through a xyron machine.  I also like to use a dry adhesive because I get instant gratification and edge-to-edge adhesive with a xyron. I've used some of the edge to also xyron labels for my pockets.

Place the front of each cover on the sticky part of the paper.  Trim with a craft knife. Since the cover is chipboard, you don't need a ruler if you're careful with trimming.

Flip the covers over, place on the sticky side of the other sheet of paper and trim.


Punch holes in the cover with the bind-it-all, and punch holes in the open side of the pocket pages.


Inside the pockets, I use my magnet cartridge from my xyron to laminate a small label.  The magnet on the xyron is strong enough to hold the spellbinders dies, but not super strong.  The pocket makes sure that any parts that fall out will remain close by.

Bind the cover and pockets together (see my earlier tutorial), put a label on each pocket, and slip the magnet inserts in the pockets.  If you like, create a few empty pockets at the end to accommodate future purchases.  You can also reopen the binding and insert more pages.  If you're careful (and not too picky about the coil being "perfect"), you can reuse the coil.  Otherwise, you can still just use a new coil to rebind the book.


I can fit several of these books in a drawer of my storage cabinet, and they're really easy to flip through.  These save a lot of space on storage over the original packaging, and I think they look pretty, too!

My organization series is almost done.  I'll share some tips in my last post about how I'm going to work to keep this up and not fall back into bad habits.  I'd love to hear other ways of organizing dies.  What are your favorite methods?

Monday, November 01, 2010

Organization tip #3: Rubber stamp storage

I love rubber stamps.  Lately, I love unmounted stamps, because they are so easy to store.  My unmounted rubber stamps are stored in three-ring binders.  Each stamp set is in a plastic sleeve.  The front of the sleeve has a sheet of cardstock with index images.  I write the category of the stamps on the cardstock.  I try not to use too many categories (All Occasion, Nature, Great Outdoors, Borders & Backgrounds, Hobbies, and Nostalgic).

Stamps are stored in plastic page protectors.  The front of each page protector is a piece of cardstock with the images printed on it.

I print the index images on a second sheet of cardstock that I run through my xyron laminator.  My rubber stamps are coated with a tacky glue that allows repositioning (I like the Mount It glue sold by Club Scrap, or Aleene's Tack it Over and Over).


I make a paper copy of each index page and put them in a three ring binder.  This way, I can sort through my images without pulling the larger binder off the shelf.

My wood mounted stamps are stored in some various ways.  Some of the Stampin' Up! stamps are still in their boxes, but others are unmounted or stored loose in a cabinet.  I didn't get to do too much sorting of stamps yet, but I hope that I'll have time to do a purging of those soon to make room in my cabinet.

How do you store your stamps?  Do you like unmounted or mounted stamps better?  Cling, rubber or acrylic?  I'd love to hear what you think.

LinkWithin

Related Posts Plugin for WordPress, Blogger...