Thursday, October 11, 2018

An autumn tag tutorial

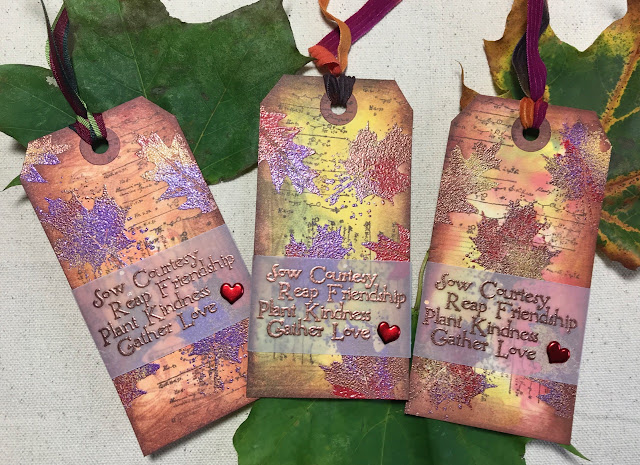
For our annual Club Scrap retreat, we were asked to create six tags to swap with the group.  It's a fun way to meet people and share techniques.  I took a few pictures along the way to show you how I created this tag.


I wanted embossed leaves of different colors to mimic the beauty of the fall leaves where I live.  I used Autumn Splendor (October 2004) stamps to random leaves with versamark ink.  One of the stamps had some spots around it, which I thought would add a little "noise" and cover up any stray embossing powder that might stick to the tag. I put each color of embossing powder on a separate piece of paper.


I sprinkled each color on the tag, shaking off after each color. You want to sprinkle sort of randomly and lightly - you don't want to try and coat the whole tag with each color.  I started with purple (Paul's idea!) in this tag.

Next I did yellow.

Then I did a red.  I tried to make sure there was a little blank space left over on each, but as long as you lightly sprinkle, there will always be a few spots that are open.

Finally, I generously coated the tag with a copper embossing powder.  I wanted to make sure the entire image was embossed.

This is the result after embossing.  The leaves all look a little different on this tag, and on every tag.  I really liked how this looks!

Next, I used ash ink from Club Scrap to stamp this stitched image from Wild, Wild, West (October 2005).

I then used distress inks (mustard seed, barn door, and peeled paint) to apply color to the entire tag.  I used different ways of doing this on all of the tags.  My favorite was to spray the tag lightly with water and swipe through the colors.  At this point, I have to admit that I didn't love all of the tags.  Some of the colors were quite dark, and the leaves disappeared a bit, but I kept on going!  Ash ink is supposed to be waterproof, but I did see a little bleeding on some of the tags - there was a lot of water here!  I liked this look.

After all of the tags had dried, I used this noise stamp from Science (September 2005) in Earth ink to create more texture. After stamping, I wiped any ink off of the embossed images.

After that, I used an ink applicator to ink the edges in earth. After doing this tag, I did switch to mahogany ink. I liked both, but the mahogany was a bit richer.

 To finish the tags off, I stamped a sentiment from Autumn Splendor on vellum paper, and taped it on the back.  I did put all of the tags in my book press overnight to flatten them out.  I then added a heart brad, and some ribbon or fiber to complete the tags.  I just love how no tag is identical.  I've shown a few of them below.


I hope my swap partners love receiving these as much I enjoyed making them!

Saturday, June 23, 2018

Suminagashi Paper Marbling - Club Scrap Challenge

This month, Julie challenged us to try different marbling techniques. I had taken a class on suminagashi marbling, and had been wanting to try this again.  The nice thing about this this technique is that it is water based which leads to easy clean up and minimal supplies are needed.  I'll link to some supplies and resources at the end of this post.

After playing for a while, I had many sheets to make into cards! I liked using watercolor paper and newsprint paper (no printing) for this technique best.  Mulberry paper also works well, but if it's deeply colored, the pale marbling might not show well.

I decided to have some fun just by using them as backgrounds to start.  I decided to use the June small die of the month from Spellbinders to create some cupcakes and candles. This is a standard 4.25 x 5.5 card so you can see the scale of the cupcake.

I thought the cupcake was a little large, so I switched to just using the candles on a few cards.


Finally, I used a punch to create some shapes for layering and had some fun with washi tape and other sparkly things.


Supplies and resources

  • Sumingashi paints were from a set that has enough colors and paints to last a long time.  I mixed some of them to create different blues and greens in my samples.
  • Sumi brushes (Club Scrap members may still have one from the Pure & Simple kit) are the traditional brush to use - look for smaller ones since you don't want a lot of paint in your brush.
  • Some paper and embellishments were from the Paradise kit
  • Ruth Bleakley has a nice post on trouble shooting sumingashi marbling
  • Washi, die cut papers and sentiment stamp are from my Club Scrap stash of papers.

Sunday, April 15, 2018

Shibori Technique Challenge

Julie posted a great tutorial on a technique to make shibori-style prints from tissue paper.  This technique is inspired by Club Scrap's April kit - Shibori.  I tried it out today and made these lovely cards.

The blue and purple were some spray mists that I love.  I wasn't completely happy with the color coverage on these, but by stamping in colors and black ink, I made some great backgrounds for cards.  I used my xyron to cover a piece of white card stock with adhesive and laid that on top of the tissue paper to give the tissue paper some stability for stamping.


I had a lot of fun with this technique, and made several more tissue paper strips after this.  I altered Julie's technique by spraying my tissue paper with water first before applying the sprays.  I hope to share more cards soon!

LinkWithin

Related Posts Plugin for WordPress, Blogger...