Wednesday, February 27, 2013

Up, Up and Away - A Club Scrap Blog Hop

It's been a long time since I organized what I think was the last unofficial blog hop in 2011 (was it really that long ago? - wow!).  Hetty has graciously stepped up to organize us once again with Club Scraps help, and I'm happy to participate!  This month, we're all featuring projects using the newest Club Scrap collection, Up, Up & Away.

Many of my paper creations solve a problem, and this is no exception. Paul and I have started figure skating, and there are tests that are printed up in a lovely spiral softcover book.


I'd like to keep this in my skating bag, but I'm worried that it will get a bit rough over time.  I remembered that the quick jot journal from Club Scrap had a lovely wrapper for a book, and I've adapted that before for a different spiral book, so I decided to use that design for this book.

I started by making a pocket (see my tutorial) out of some scrap paper and making sure it was the right size.  Because of the size of the book, the back of the pocket is only a partial back, so I wanted to make sure that everything slid nicely and fit before I did it for real.


Then, I made a prototype of the book using papers from the Bistro kit.  I used an elastic closure (see my tutorial) to keep the book neat and tidy.

I like this prototype (the Steppin' Out stamp makes such a cool background, although I did a bit of double stamping by accident on the front!), but the spine is a bit too large, making the overall book a little "floppy."


Finally, I made my real book with Up, Up, and Away paper.  The blue ribbon is a bookmark so I can mark my place when I'd like to.  I was inspired by Lisa to mix and match my kits.  The red paper is from the Study in Red collection (I wanted to use a cardstock rather than the text weight red in the kit), and the stamps are from Stratosphere.  It's a little tough to see in the photo, but I used versamark ink to stamp the swirly pattern all over the red paper. I really like how they pair.

The spine is nice and snug now and the book opens so nicely.  I used the bright blue paper from Up, Up, and Away for the pocket and inside cover, although you only see a peek of it in these photos.


I hope you enjoy all of the inspiration from the rest of the Club Scrap bloggers this month.  I hope to see you next month for another installment.  Come back next week for a very exciting announcement!  I've been keeping a secret for a while now....

The exciting news for this week is that I passed two figure skating tests this weekend for the Dutch Waltz and Canasta Tango. It was a fabulous experience!

Visit Deb Weller at Deb Duz Scrappin' for the next blog in our hop, and here is a list of everyone who is participating.  It's going to be a fun day!

Club Scrap Creates starts us off at http://clubscrapcreates.blogspot.com
Deb Charlesworth at http://liftbridge.blogspot.com/ 
Jill Pechauer at http://jmp1022.blogspot.com/ 
Hetty Sanders at http://craftchaos.blogspot.com 
Kay Williamson at http://kayskeepsakes.blogspot.com 
Anne Marie Healey at http://artfullybalanced.blogspot.com 
Shona Gibson at shonascraps.blogspot.com

Monday, February 18, 2013

Spark your mojo - make a card for someone you love

Even when I'm not feeling very crafty, thinking about my sweetie sparks me to make something special just for him.

I like to try and use new things for him, especially since he sees a lot of what I buy.  This Christmas card uses a new stamp that hadn't seen ink yet (Snow Buddies from Crafter's Companion), and little jingle bells from Stampin' Up!


I usually use a lot of paper on Paul's cards, since I'm not trying to mail the card or make the card meet a price point to sell.  It's fun to see how much paper I can use!  This one mainly uses paper from the Academy kit, green paper from Retro, and various love themed stamps (no longer available - My Funny Valentine, and a special release from Stampin' Up!) on the tan paper.

Paul always takes his turn making cards, too.  I just love how this looks like a stained glass window, and celebrates our recent trip to Disney.

This week for Valentines' day, I had an idea while watching the Paperwishes video show - since he's my sweetie, how about a sweet cupcake as an image?  This cupcake is a Dazzles Mix 'Em Cupcake - mix and match the shiny pieces to make your own unique cupcake.  Add a paper doily, some heart banners (still trendy!), and again lots of layers, for some Valentine's fun.  There are lots of pearls on the inside - I can use as many as I like since it won't be mailed!

Paul did another quilled masterpiece for me, as well.

So, spark your creativity this week by making a card for someone you love!  And, check out our other cards to each other here:

Sunday, February 03, 2013

Spark your crafty mojo - let the paper do the work

Since my crafty mojo was temporarily displaced, I needed to kick it into high gear and make some cards quickly.  Last week, I shared some of my ideas on how to spark your creativity, so this post continues those tips.

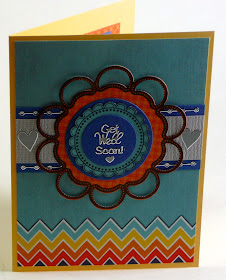
One of my biggest tips is to let the paper do the work for you.  Pennants, banners, and chevrons are huge trends right now.  So, I used paper with these elements in it to make this card. This paper comes from the Happy Days Double-Sided Paper Pack.

When you've got one piece of paper working for you, make a second card.  That way, you can get two cards for the creativity of one!

Both of these cards also used Dazzles - they're very popular in England, and Hot off the Press is the best place I've found for these items.  I love their monthly club, because you get a nice variety of stickers, paper, a goodie, and a newsletter with ideas every month.  

Dazzles are stickers (which make them very easy to use) that look like embossed images (which make it look like you spent a lot of time making the card!).  They come in a variety of finishes, like copper, holographic colors, silver, and gold.

Several Club Scrap kits have also featured them, so check them out if you're interested in using them in your scrapbooking.
  • Retreat 2012 - these numbers are super useful for birthday cards. I used them for Paul's card last year (which I haven't posted yet - eek!).  Get the full kit for even more numerical items.
  • Bright lights, big city - these little stars pack a big punch.  The full kit has more coordinating items.
So, the next time you need to make some cards, but don't know where to start, let your paper do the work!  Share any tips you have for using paper to get started in the comments.  I'd love to hear what you think.