I was recently honored to be asked to design a piece for Making Memories using their new Panorama collection of papers and embellishments. I was featured on their blog last week. In case you missed it, here is my take on the project.
First, I created a cover for my project. I used several pieces of book board, covered with paper. I just loved the postage stamp border, so I wanted to make this the most prominent part of the cover. I glued ribbon on the inside to create a nice tie for the cover. You probably can't tell from the picture, but the airplanes are embossed - very cool effect.
When you open the cover, a coil bound album is on the right, and tags are on the left. Pockets hold both in place. I've previously done a tutorial on how to make a coil bound album and pocket. The pocket on the right is 3/8" wider than the width of the book. Making the cover is similar to my post bound album tutorial, but with three pieces instead of two.
The tags were from scraps of the paper and some of the trading cards. I used the index prints from my order, rub-ons, and ribbon to embellish the tags.
I decided to spend most of my embellishing energy on the cover of the book. To start, I did an image transfer of one of the patterned papers onto chipboard. I primed the surface with gesso, and while it was still wet, placed the patterned paper on top. When dry, I wet the paper and rubbed off the paper back. I used stamps from the collection and two (Remember and Journey) from my Club Scrap stash to recreate a little word collage. When stamping on the image transferred paper, the ink does naturally bleed a little bit. Finally, I used more pieces from the kit and index prints to embellish the cover.
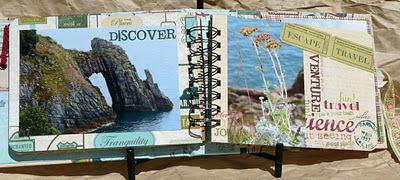
The inside pages of the book are chipboard covered with the patterned paper. I used a lot of the rub ons inside the book. I love using these on top of photos. The pictures from Devon and Cornwall last summer were so gorgeous on their own, I didn't feel they needed a lot of extra embellishing.
I really love the collage words on the right hand side. This is where I got my inspiration for the cover.
I love how this worked out on the right. The "sign" says "Smell the Roses" with "STOP" in the center. This is another paper with embossing on it, which doesn't really show in the photograph.
I also found that the Distress Inks by Tim Holtz coordinate really well with these papers. In particular, I used Weathered Wood, Vintage Photo, Peeled Paint, and Fired Brick.
Having trouble finding some of these items? I recommend Blockhead Rubber Stamps for the distress inks, and Two Peas in A Bucket for the Making Memories items.


Deb this is amazing! A work of art. Congratulations on being asked by Making Memories to design something. An honour indeed and you certainly did them proud! I loved seeing your snaps from Devon and Cornwall too. Looked like a fabulous trip.
ReplyDeleteLook forward to seeing your next project.
Hi Deb,
ReplyDeleteThe book is gorgeous as usual! I made it to Hollanders last week when we were downstate and I thought I have got to get together with you sometime to make a book with you. That is, let's see, when you are not too busy and it coordinates with a time I am not too busy.
This is just beautiful! You did a fabulous job on this book!
ReplyDeleteCongrats on being MM's guest designer; this book is awesome!! I'm sure they loved it too.
ReplyDelete