Although the pandemic affected many suppliers for our project, I'm happy to report that the remodeling part of the studio project is complete!
First, we got the carpet installed. We're using carpet squares that are just taped to the floor - just in case there are some crafty accidents!
Then, the countertop went in. This is a laminate top with a grey stone look.
Finally, the trim went in around the room to give a finishing touch. We also added the iconic IKEA pegboard since we wanted to take advantage of the walls for storing things.
A floating shelf is currently on the floor under the TV - I will be using that as a resting place for some common supplies I would like handy.
Now that the major construction is done, I will start organizing some of my supplies and building my desk. We decided on a butcher block for my desk; it will arrive next week.
Over the last few months, I have been purging supplies, and creating space in different areas to store my scrapbooks.
Here you can see the scrapbooks are gone and the large wooden cabinet. I replaced the cabinet with a utility shelf from the basement since I wasn't ready to move the supplies yet. I was amazed at how much bigger the room felt with this small change.
This is a bit further along and close to when I moved. The supplies on the utility shelf have moved downstairs, and the bookshelf is ready for a friend to take.
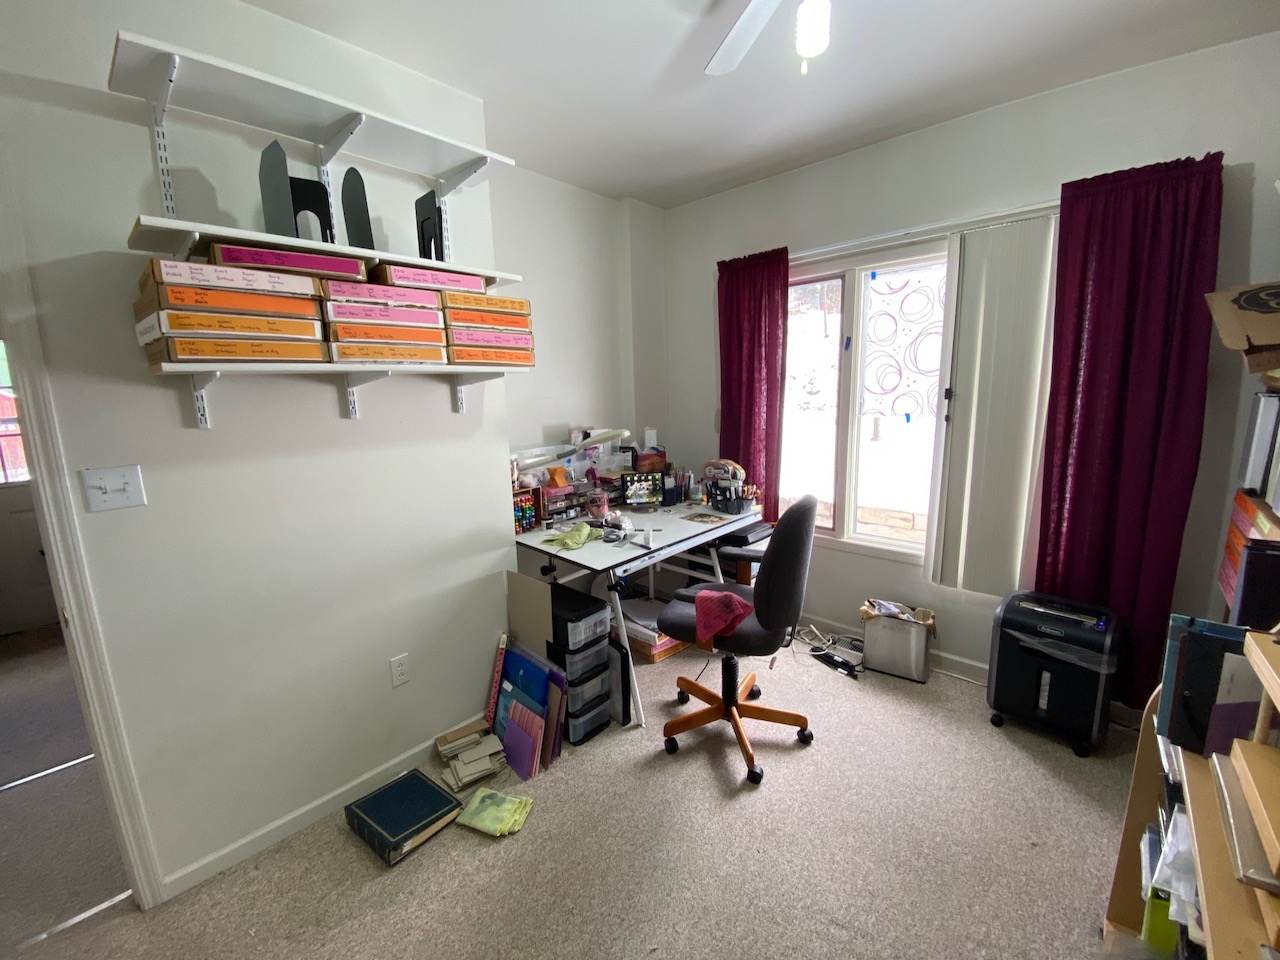
The filing cabinet in the closet has been moved to the porch, and the pizza boxes on the shelf have been relabeled. It's hard to tell because I had them tucked in so many places, but I was able to reduce those by about 10-12 since I got rid of some kits and I had used so many.
A view of the desk.
And, this is the empty room ready for the crew to start! The blue tape indicates where the cabinets are planned to be and where we want to place some items to help the electricians out.
In our home, we've had two years in a row with major home renovations, and we're about to make it three in a row. Two years ago, we landscaped our yard. This made us see how dated our kitchen was, so last year we had the kitchen done. We had plans to fit my book press in a kitchen cabinet. When that didn't fit, we decided to renovate the office (aka, my studio!) and our laundry room.
So, over the next few months, I will share with you where we started, how the project is going, and where we end up. Along the way, I will share some organizational tips.
As you walk into the studio, you will see a bookshelf, desk, cabinet with stamps, and a wall cabinet with ink pads.
On the opposite side, I have a large cabinet on the left. My husband had that made for my 30th birthday, and the drawers on the right are perfectly sized for 12x12 paper. There are shelves above that hold supplies and my scrapbooks. My desk is right next to the window. It is a large drafting table, and has items stored below, on top, and on the side.
Here is a better view of my desk. I have paper trays at the back that have trays to hold inks and other supplies. My letter trays and desktop station are from Likeit.
Opposite the window is a closet. We have a lateral filing cabinet in here and have filled the closet with adjustable shelves. Behind my door, I have a punch pal which is filled with paper punches.
I love that this room has the best light all day since it's south facing and it now looks out over our new deck from our landscaping project.
What I don't love about this room is how we've just cobbled things together over the year. Each piece of furniture was bought at a different time to solve a current need. The closet is also full of space, but because of how it's framed in, we lose about 2 feet of vertical storage there. The whole room is also too full of stuff.
Our idea for moving forward is to replace all of the individual cabinet pieces with built in cabinets and remove the closet. In the picture below, the bookshelf is going to be in the same place as the current bookshelf. The short piece of the "L" will fit in the former closet location.
In the coming weeks, I will show you the progress I've made and the construction as it goes along!
This is the last (for now!) in a series of blog posts describing how I'm going green and using digital tools to organize my crafting supplies. Although I'm a paper crafter, this technique could really be applied to any craft or beyond. If you're late coming to this series check out the other posts:
So, at this point, you have a lot of digital images of your supplies, and you have an idea of how you would like to categorize them. In this post, I will talk about why and how I use Evernote to store these electronic materials. It's a long one, so feel free to jump to the section you need:
It's (mostly) free. Everyone can get a free account to try it out, and for many people that will be sufficient. A premium subscription costs $45/year or $5/month, which I'll discuss more later.
It's portable. You can install it on a Mac or PC, access it anywhere from a web page, or install an app for your mobile device (iOS, Android, Blackberry, etc.)
It syncs everywhere. If you log into a web browser at work and add a note, the changes will appear on all of the other devices you access your Evernote account. It will, of course, need to sync from the server to download the new notes.
It can save anything - not just images. So, I can include catalogs in PDF format, web pages, images, etc. I find that handy since so many companies have PDF catalogs.
Everything is searchable - including text in images. This makes it super easy to find a stamp with the word "birthday" in it when I'm making a birthday card.
You can get your data out of Evernote. While I don't plan on doing this, it's nice to know that my data is stored on my computer, and I can export it as an XML or html file anytime I like. XML files are standard file types, so given the popularity of Evernote to date, I'm confident that another program could import these notes if I wanted to leave Evernote. But, why would I?
Here's an overview of Evernote for PC users:
And for Mac users:
Organizing in Evernote
Every item you bring into Evernote is a note. You can organize your notes into notebooks. Each note can have the following information associated with it:
Title
Notebook
Tags
Date created/added (can be edited, which is useful if you're backloading older supplies)
URL (this is added automatically if you are using the web clipper to make a note)
Your notes - you can type anything you wish, and format using tools just a like a word processor
I'm showing a screen shot below of my Evernote program on my Mac - it is almost identical for the PC (which I use at work). In it, you can see three columns. The left most column has your notebooks (boxed and labelled 1), and your tags (2). The center column has a preview of all of the notes in the notebook or tag selected. I have the "Crafting Supplies" notebook selected right now, so you can see it's highlighted in (1).
The right hand area (3) shows the note. In the note, you can see all of the information for the note I've selected in the center column:
Title: 2012 03 Tahiti CSJr
Notebook: Crafting Supplies
Tags: All Occasion, CS Stamps, UM
Created: Mar 15, 2012
Updated: Mar 15, 2012
There is no URL for this note, but if there was one, it would show up to the right of the updated date.
On my computer, I most often use Evernote with the application, rather than the web page. My screen shots will show me using a Mac, but refer to the Windows version when something is different.
Entering notes - drag and drop
Drag an image onto a notebook or a tag, and a green "+" sign will appear. The plus sign didn't grab in the screen capture, but you can see the notebook is highlighted below, and the ghost of the file I'm dragging:
A note will now appear, and you can edit any fields. The notebook "Crafting Supplies" has been automatically selected, but I can change it if I made a mistake:
On a mac?
Dragging multiple files at once will create multiple notes.
The default name of the note is the filename without the extension (.pdf, for example, is missing from the above example)
On a PC?
Dragging multiple files at once will create one note with multiple files attached to it.
The default name of the notes is the filename with the extension (includes .pdf, for example)
Entering notes - automatically
On a Mac
You'll need to use a script to automate the process. Luckily, the Thought Asylum has a nice write up for theirs. You can edit the script to watch a folder, which is what I did.
On a PC
Create a folder that you'd like watched, and use the "Auto Import" tool to automatically create a note anytime you add a new file. If you use this function on a folder that has files you've already imported, it will re-import them all, so be careful!
Entering notes - from the web
On your browser
Evernote has created "web clippers" for all of the major web browsers. I have on occasion, found these to be flaky. It's mostly because web browsers change their technology all the time, and Evernote needs to reprogram when they do. Search the add-ons area of your browser for web clippers, or visit evernote.com from your desired web browser and click on the green box "Get Evernote - it's free".
On your mac
On the mac, a little elephant appears in your menu bar to let you clip from the OS or web browser without installing a clipper for your browser.
On your iPad/iOS device
Use the blog reader app Feedler RSS Reader Pro - Evernote clipping is built in. This is great if you use Google Reader to read a lot of blogs. When the app can't clip the content because of the way the feed works, it will still grab the URL. The Pro version is necessary to get Evernote clipping. It's a $4.99 universal app, so it will work on your iPhone and iPad.
Follow these instructions to create a bookmark that will act as a web clipper in your browser.
Via e-mail
Evernote will create a unique e-mail address for your account. Simply e-mail anything to that address, and it will be added to your Evernote account.
Finding notes
Browse
Because I like to browse, and I've got all of my supplies in one notebook, I can browse through the whole notebook, or select a tag (like UM for my unmounted stamps).
An iPad note: TIFF files, and larger PDFs don't always preview nicely on an iPad. I save these files as JPGs so I can preview on my iPad in browsing mode.
Search
Evernote supports full searching, although I'll admit it's not quite as good as Google. I did, however, find some great tips on the Evernote support page. My quick tips illustrate how to find an unmounted stamp with "Happy birthday" in it:
Select the notebook or tag first - my stamps are all tagged with "UM", so I'll select that tag first
The default search is "or" based, meaning that it will find any post with any word that you have entered. So, if you type "happy birthday" (without the quotes), it will find any notes with the word "happy" OR "birthday"
Change the search to "AND" by using the +" key: happy +birthday: will find posts with both words in it
Use quotation marks to find a phrase: "happy birthday" will find posts with happy next to birthday
Use a minus sign "-" to get rid of search terms: "happy birthday" -old: will find posts with happy next to birthday that don't include the word old
Go Premium
The basic account on Evernote is free, but does have limitations. If you go with a premium account, you will get:
An increased monthly upload allowance (60MB is free, 1GB for premium).
Faster customer support (within 24 hours on weekdays - they take weekends off - how civilized!)
Priority processing of text recognition (your documents get recognized first)
Off line notebooks - view notebooks on your mobile device even if you don't have an internet connection (this is huge for me, because I only have a WIFI iPad)
A warm fuzzy feeling because you have supported a company and product you believe in and enjoy
If you're just starting out, I would recommend buying a one-month premium account for $5 as soon as you have a load of files ready to import. After that, monitor your usage. If you don't regularly need more than 60MB per month of uploads, then maybe you just need to get a premium account some months. Web images are very small in size, so you can clip a lot of those. Scans or PDF files can be larger, though.
For me, the offline access alone is a feature I need, so I'm happy to pay the premium price - there is a discount if you buy a year subscription.
Do you have any questions or a different solution you've found useful? Let us all know in the comments! I'd love to learn from you or help you out.
This is part of a series on digital organization of scrapbooking supplies. To begin, I talked about why I'm "Going Green," and then I talked about some different ways to get digital images of your supplies in Step 1. This week, I'm going to talk about how to build a system to categorize your supplies.
Know your software
How you categorize your supplies will depend a little bit on what software you use, but there are some general similarities. I'm going to use Evernote, which I'll talk more about next week. In Evernote, everything can have these features:
Notes - these are your individual items
Notebooks - a collection of notes
Each note can also have the following attributes:
Title
Description
Tags
Date added/edited
A different system might use a different setup. For example, in iPhoto, the following are available items to categorize photos (and similar in all other photo filing software like Lightroom):
Picture - these are your individual items
Photo albums - a collection of pictures
Events - these are also collections of pictures
Each picture can have the following attributes that would help me sort/search for them:
Date
Faces
Places
Ratings (1-5 stars)
Keywords (similar to tags in Evernote)
Description
If you have no software, or don't know what to use yet, you could think about creating folders on your hard-drive. On the Mac, I can assign colored labels to each file, which could correspond to tags. It's not as elegant as using Evernote or iPhoto (what does red mean? how will you remember?), but it's an easy way to get started. On both the Mac and Windows platform, the view of a folder can be changed to show larger icons of each item ("filmstrip") so you can flip through your supplies.
Know yourself
I like to browse through things. I like piles that have similar stuff in them. I like to keep it simple. If I have too many categories, I will drive myself nuts trying to categorize everything. To satisfy how I craft, I'm going to do the following:
Create one notebook for all of my supplies so I can browse through them easily
Give each item a title that allows me to search for the things I think are important
Kit name
Kit date
Manufacturer
Tag stamps with three tags
UM (unmounted) or WM (woodmounted) - narrows down where to find it
Category - mine are very broad and match the binders I use for my UM stamps
All Occasion (doesn't fit into a category - graphic images, sentiments)
Borders and Backgrounds
Card Verses (ex: mostly text, or for a specific event like graduation or Father's Day)
Christmas and Winter
Great Outdoors (ex: trees, scenic stamps, skiing, sports)
Hobbies (ex: theater, crafting)
Nature (ex: flowers, birds, butterflies)
Nostalgic (ex: steam punk, vintage sewing)
Company name - if I don't have many by a company, I'll use "other."
Tag other stuff as needed. I'm just starting to get into "other stuff," so this is pretty fluid at this point. What I have so far:
Catalog - I love my Stampin' Up! catalogs, and now I can take them all with me (and find them!)
Embellishments - for those little bits
Paper - for packs that I pick up, particularly from Stampin' Up!
Add anything else to the description
For my sheets of stamps, for example, I'm trying to type the sentiments into the description. Evernote will do text recognition on images and PDFs, but sometimes stamped sentiments are in a script font, or other strange things happen.
For paper from Stampin' Up!, I'm going to try keeping track of the coordinating colors
Learn from others
If you're a digital scrapper, what I'm describing above should come as no surprise to you - most digi scrappers have been adding notes and tags ("metadata") to their photos for a long time.
If you're looking for a different scrapping perspective on organizing digital supplies, the Paperclipping group and The Digi Show (produced by the Daily Digi) have had some great discussions on this topic.
Next week, I'll focus entirely on Evernote, and why I think it's a great piece of software for your crafty organization. I'll show you some things I've learned along the way on the different platforms I use and share my tips and tricks.
How do you organize your supplies? What works best to inspire your creativity?
In part 1 of this series, I'll share how I got digital images for my organizational system. Last week, I shared how I'm organizing my stamps with a paper system, and why I'm going digital.
Method 1: Scan it
If you have a paper image sheet of the stamps or supplies you want to categorize, use a scanner to scan the images. If you don't have a scanner, or are unfamiliar with its settings, this is the time to learn! Here are a few scanning tips:
PNG images are generally smaller in file size, and better for web applications
JPG are also small in size, but PNGs are preferred for image quality these days. Every time you save a JPG, some image loss occurs, so minimize re-saving these images.
TIFF images are the highest quality, but also take up the most space.
To get high quality images, set the scanner resolution to 300dpi. You can print these images later if you need.
If you're concerned about file size, 200dpi will get you very nice quality images while reducing the file size.
My Club Scrap index sheets back to 2004 were on paper, so scanning them was really the only option. A sheet feeder on my scanner (and a patient husband!) helped this process go more smoothly.
Method 2: Save it
Most craft manufacturers have great web pages these days. Navigate to their web page, and find the supply you're interested in cataloging.
Web page image
If the photo is on a web page, "right click" on it and select "Save Image As...". Give the file a name, and pick a location. I show below how I'm saving an image from my blog. The screen shot is from Safari, but this option is available in any browser - the menu might look different for every browser.
PDF Catalog
Many manufacturers have great PDF catalog with wonderful images, and samples of how to use their supplies. If you also want to capture some of that information, find the PDF catalog.
On a Mac?
Open the catalog in Preview (included on every Mac) to the page you want to capture
Select File...Save As...
On the pop-up menu, select the format you would like for your image (I'm choosing JPG)
Finally, select the resolution, file name, and file location.
On a PC?
If you own Adobe Acrobat (the full version, not the free one) you can also "Save As..." a JPG (in version X) or "Export" to an image (in version 9)
Adobe Photoshop, Photoshop Elements, and many other graphics programs can open PDF files. You can then edit your images as desired.
If you aren't concerned about image quality, you can take a screenshot of the page and save it in Paint.
Method #3: Take a picture
If all else fails, or you want to catalog three-dimenstional objects that won't scan well (like beads), use your digital camera to take a picture of the item.
After you have the images
Rename the images.
The scanner gave all of the files digital names. These aren't very searchable. I wanted to be able to search by company, date (for Club Scrap kits), or name. On my mac, I renamed each file to contain:
Company name (CS = Club Scrap, HA = Hero Arts, SU! = Stampin' Up etc.)
Kit or stamp name
Date for kits
Type of stamp (Club Scrap has Borders and Backgrounds, Font Art, JR images, etc. in each month). The screenshot below shows some of my Club Scrap image sheets.
Back them up.
After you've done all this work, you don't want to worry about losing them. For a project like this, I like to use Dropbox (join through this link and we'll both get extra storage space - free!). With Dropbox, my files are:
Backed up - stop worrying about losing them!
Accessible anywhere - look at your images on a computer, iPad, or other device with Dropbox installed
As a caveat, the copyright policies of some PDF files may prevent you from exporting images in the ways I've described. Additionally, some companies might argue that their copyright policies do not allow you to copy any images. In my reading of copyright law, I believe that the personal reproduction of these images for your own personal use is fair use, and perfectly acceptable. Do not, however, try to sell any of these images or use them in ways that aren't generally considered fair use.
Next week, I'll share some ideas about categorizing my images now that I have them. A little thought here will really help as you move toward a tool that allows you to search and store your images.
Do you have any tips to share or questions? Let me know by leaving a comment! If you liked this post, share it with your friends, too. I think we could all be a little more organized.
Do you find yourself not being able to find your supplies? Do you forget what you own and then buy it a second time? Don't worry - you're not alone, as I'm guilty of saying "yes" to both of those questions!
Over the next few weeks, I'm going to share some ideas I have for digital organization of your crafting supplies. This could apply to nearly any craft, and can work whether you own a Mac, PC, or iPad - I'll give you tips for each platform, as I work on all three.
Before we get starting on going digital, I thought I would share what I'm doing now, and why I'm making the switch to digital organization.
Current stamp organization
My stamps are organized in binders, with an index sheet on the front, and a laminated index sheet behind it. I scan, stamp, or download an image of the stamps to create the index sheets using photo editing software as needed. Several images sheets can generally fit on one page, making stamp storage take up a little less space.
Binder with stamps (8.5 x 11); stamps can be pulled out of the page protector for easy use.
Each index sheet is then printed as a half-sheet of letter paper, and put into a three ring binder.
Smaller binder with index sheets for all of my stamps (5.5 x 8.5)
I started this organization process after I had been stamping a while, and I generated a list of some categories that work for my crafting. The binders are separated by these categories, either as a whole binder (for the stamps) or an index divider (for the index sheets)
All Occasion (doesn't fit into a category - graphic images, sentiments)
Borders & Backgrounds
Card Verses (ex: mostly text, or for a specific event like graduation or Father's Day)
Christmas & Winter
Great Outdoors (ex: trees, scenic stamps, skiing, sports)
Hobbies (ex: theater, crafting)
Nature (ex: flowers, birds, butterflies)
Nostalgic (ex: steam punk, vintage sewing)
To find a stamp, I flip through my index sheet binder (it's smaller and lighter than the stamp binders!), select a stamp, and then grab it from the binder. I still have plenty of woodmounted stamps, too, so those are also in the index binder. They are cross-referenced to their location so I can find those, too.
Why go digital?
Here are some compelling reasons I'm going digital:
The binder is getting big - and full. I'd like to be able to "store" my images in a smaller footprint, and not use up more space to store sample images.
I can't find what I own. My husband might tell me to sell some supplies, but we all know how realistic that is! If I go digital, I can plan on searching with a digital database.
Club Scrap has gone digital. Each month, I get a new Club Scrap kit. Each kit comes with great ideas for layouts, stamps, and more. They used to send out paper versions of all of these items (that fit in cute little binders), but are now sending me PDFs. I don't want to print out PDFs if I can avoid it, so this is a good time to switch.
Only my stamps are organized. How many times have you gone to a Stampin' Up! party or scrapbook store to wonder if you owned something that you were considering purchasing? With a digital system, I could organize more than just stamps more easily.
It's greener. This isn't the most important reason for me, but it is another factor. Of course, as an engineer, I then start to wonder how much electricity I'm using with my digital system....
What's next?
So, in the next few weeks, I'll share with you:
How to get digital images of paper supplies (it's easier than you think!)
How to decide on a categorizing system
How to use digital tools (most of which are free!) to store and access your materials
Is there anything you'd like to see or have me add to the series? Let me know! I'm still writing, so there is plenty of time to shape the discussion and have your questions answered.
So, this week has been a great week of thinking about my blog and how I organize my crafty supplies. It's not quite spring in Lift Bridge land yet (in fact, it's snowing a lot today - great for skiing!), but for some reason, I feel like spring cleaning!
After living with my letter trays for a while, I decided that they really work for me. It feels natural to have everything in front of me, waiting to be used. You can see where I started in January. So, I took the plunge and bought two more trays.
As I used my crop-a-dile to punch the holes for the labels, my brain went "ding-ding-ding!" I realized that my crop-a-dile would fit on a letter tray if I made a slightly smaller paper tray to go on its side. So, here I go - crop-a-dile in pink container on top with a slightly smaller paper tray on the right. My paper piercing pad (also pink) fits just underneath, too.
A few of the trays are filled, but I'm still deciding what will go in them - so the labels will wait. I know at least one part will have some of my labeling stamps, and one will have card blanks and finished cards waiting to be priced, sealed, and filed.
I also know I want a few trays to hold miscellaneous embellishments. I can then pull these out and start to play with what is here. Keeping them closer to my work space will help me remember to use them, but having them in a tray will let me get them out of the way while I'm working on a project.
It feels really good to have an organized desk. I can create better when everything has a place and I'm not overwhelmed by clutter. It also feels really good to use "special" supplies for me rather than waiting for the perfect project to use them. The Lost and Found paper is so wonderfully vintage, and those metal pieces from Stampin' Up! are just perfect. I could have waited forever for the perfect project, but now I get to look at them every time I craft.
Over the next few weeks, I'm going to share some digital ideas for cataloging your physical supplies. I'm "going green" and will tell you why and how!
I also took some time this week to take a blogging class - and it helped me to crystallize what I want to write about. I want to:
inspire you to make beautiful books and cards from paper
show you my creative process along with the tools I use
give you great ways to use my books and cards as gifts for your friends
That covers a lot of ground - what are you specifically interested in hearing from me? What posts are your favorite on my blog? I'd love to hear what you think in the comments!
When I ended organizing my desk, I was left with these open paper trays.
These are great, but I have lots of "bits" that need a home, and not so much letter sized paper (that already has a home in different places). The container store sells trays, but they have dividers in the middle and I wanted something custom sized. So, I made my own!
OK, I'm fibbing a little bit, but I reorganized my desk in mid-December. You might remember back to my last big organization, where my desk ended up looking like this:
This worked really well... for a while. The rotating organizers hold a lot of stuff, but almost too much stuff. The black one in particular would become unbalanced pretty easily, and started to get really tippy. It also felt a bit like too much empty space - they need a lot of space in order to spin freely. So, my desk more typically looked like this:
Is one of your resolutions to clean up your craft area? If so, you might be interested in a series of posts I did last fall where I showed how I...
Got rid of stuff - if there isn't room for it, it won't be organized! (And, I made money in the process - about $100 from my local scrapbook store's rummage sale!)
New stuff arrives on a monthly basis (I love those Club Scrap kits!), and who can resist a purchase at the local scrapbook store? I got some great gemstones, fall leaves, and a pen there this weekend.
So, why do I continue to purchase more, when I have plenty? I've come up with a few guidelines to guide future purchases and help answer the question - should I really buy this?
Replacing tools. I use my black marker for a lot of journalling, and it's dry. It's ok to buy a new black marker, because I'll get rid of the old one that doesn't do the job anymore.
Purchasing basics. The gemstones were an item that I previously had and used up. These are basic, and I still like them. A little sparkly item goes a long way. I also stock up on adhesive, since it's cheaper to buy ATG adhesive in bulk.
Buying special items. The leaves aren't something I need, but they fit in my style. When I saw these, I could see them fitting on scrapbook pages, and cards that I'd like to make for Thanksgiving.
Inspiring me. My Club Scrap kits provide a monthly spark to my imagination. If something sparks your imagination, it could be worth the purchase price just for that reason.
How will I fit these items in my home and continue to stay organized? This is what I'm thinking...
Go up! My husband saw an opportunity for me to have more shelves in my room. We'll be installing those shortly to provide much needed storage space for my finished scrapbooks.
Purge as I go. When a new item comes in, it either needs to fit in the space I have, or something else has to go. I put these items in a box upstairs. When the annual rummage sale time comes around, I can sell them, or put them back in my stash if I've changed my mind.
Keep a clean desk. I did this in the summer for a while, and what a difference it made! After a project is done, I'm going to clean my desk. If the desk is clean, it's more inviting to work there, and provides room to sort and store new items as needed.
What guides your papercrafting purchases? How do you stay organized? What do you continue to struggle with in your craft space? It's great to share ideas! Hope you enjoyed this series. Now that I'm organized, I can go back to crafting!
I love spellbinders dies, especially the nestability dies. These dies come in basic (and complex) shapes in a variety of nesting sizes. I like to make my own bind-it-all binders to store these dies. They're trim, easy to make, and group my dies into nice categories.
First, I got all my dies out, and decided which dies would fit in which book. This book is all about shapes - leaves, flowers, santa, bridge, etc. I'll be using a bind-it-all, cardstock, scor-it, patterned paper, a cutting mat, and a craft knife for my initial supplies.
To make the pockets, I take a 8.5 x 11 piece of paper and score it at 5.5" with the paper in a landscape orientation.
Rotate the paper 90 degrees so it is in a portrait orientation, and score at 5".
Fold the long edge up to form the pocket part. Reinforce the fold with a bone folder.
Fold the paper on the other score line. The folded edge will be on the outside of the book, while the open edge will be the binding edge.
Next, I make the covers. Trim two pieces of chipboard to 5.75 x 5.25" using a craft knife, and cutting mat. I choose thinner chipboard for this project - you'll be covering it with patterned paper and punching holes in it later.
Trim a 12 x 12 piece of paper into two 6 x 12 pieces. Run each piece through a xyron machine. I also like to use a dry adhesive because I get instant gratification and edge-to-edge adhesive with a xyron. I've used some of the edge to also xyron labels for my pockets.
Place the front of each cover on the sticky part of the paper. Trim with a craft knife. Since the cover is chipboard, you don't need a ruler if you're careful with trimming.
Flip the covers over, place on the sticky side of the other sheet of paper and trim.
Punch holes in the cover with the bind-it-all, and punch holes in the open side of the pocket pages.
Inside the pockets, I use my magnet cartridge from my xyron to laminate a small label. The magnet on the xyron is strong enough to hold the spellbinders dies, but not super strong. The pocket makes sure that any parts that fall out will remain close by.
Bind the cover and pockets together (see my earlier tutorial), put a label on each pocket, and slip the magnet inserts in the pockets. If you like, create a few empty pockets at the end to accommodate future purchases. You can also reopen the binding and insert more pages. If you're careful (and not too picky about the coil being "perfect"), you can reuse the coil. Otherwise, you can still just use a new coil to rebind the book.
I can fit several of these books in a drawer of my storage cabinet, and they're really easy to flip through. These save a lot of space on storage over the original packaging, and I think they look pretty, too!
My organization series is almost done. I'll share some tips in my last post about how I'm going to work to keep this up and not fall back into bad habits. I'd love to hear other ways of organizing dies. What are your favorite methods?