Monday, October 31, 2011

Tutorial: Masking to make holiday cards

I love to use masking to create depth and dimension to my cards without adding a lot of bulk. Sometimes, you want a card with fewer layers to allow you to mail it more easily.

In my video, I show how I made the panels for three different cards.


Here is the finished card using technique number one:


Thursday, October 27, 2011

Crafting for fall - cards with distress inks

I'm still in the mood to play with distress inks, and I had several friends I wanted to send cards to. These are the results! If you missed me playing with distress inks, be sure to check out my earlier post.  Most of the paper is from the Scholarship and Adobe kits from Club Scrap - some great blues and tans in there.

Stamps and punch from Stampin' Up!

On these next two, I had a lot of fun using my Tim Holtz Tiny Attacher.  Check out my earlier review if you want more information on this cool stapler.
Punch and friend stamp - Stampin Up!; Leaves from Club Scrap.

Monday, October 24, 2011

Cards for a Cause

October is Breast Cancer Awareness month, and this year I participated in a card-making event during the Club Scrap retreat to create lots of cards to give to a local charity.

When we first opened the stamps, Paul thought "Bald is beautiful" was a stamp made for him.  I'll have to figure out how to repurpose that into a card for him someday!


Thursday, October 20, 2011

Swapped Puzzle Pieces

As much fun as it is to make altered art, it's even more fun to receive it!  Here is a quick post featuring the lovely art work from the artists at our Club Scrap retreat.  If one of these is yours, please leave a comment so others can get in touch with you to find out more!
A few of mine at the end.

By Judy Y.

Monday, October 17, 2011

Altered Jigsaw Puzzle Pieces

One of the fun things to do at a Club Scrap retreat is participate in a swap. This year, we swapped altered puzzle pieces. Some google searching did not yield many ideas, so I struggled a bit with this. I really like to add paper to altered objects, but couldn't imagine cutting around all of the pieces. I finally decided to work with inks and embossing. To start, find a puzzle with fairly large pieces - I thought this child's puzzle would be great (I found mine at Goodwill).

Next, I sanded the pieces a bit to rub off some of the paper, and provide some "tooth" for the next step.

I then painted each piece with two coats of gesso. I like to start with a white surface when I alter items. I do the same thing when I alter board books.  I used a mini-file to round off any bumps and to lightly sand the worst of my brush strokes off of the surface.

Each piece then got a coat of ink. Pigment ink worked great for this, as did brilliance ink. I'm showing one of my pigment ink samples here. I let these dry overnight. You could use a heat gun, but it takes a while with 20+ pieces.

To add a bit of texture (and fit with the Club Scrap retreat), I used a stencil from a kit and a mist to spray. Interestingly, I got super sharp transfer when I tried this out the day before, but some of these bled and really faded a lot. I'm wondering if my pigment ink was "wetter" when I did it the day before.

Since some of them were too light or monotone for me, I used some different inks with the stencil to apply another dimension to the background.

Finally, I embossed a background stamp on the puzzle piece with Stampin' Up! silver embossing powder. By far, they make the best embossing powders in my opinion. I also did a quick coat with acrylic sealer to give the overall surface a little shine (this is before the coat).
Some tips for altered projects:
  • Make a lot.  I always start with more than I need so I can experiment and try some things out.  This puzzle also had some damaged pieces, so those made great test pieces.
  • Test your techniques.  I used a piece of chipboard and gesso coated it to see what inks would dry on the surface.  It turned out that all of them did (eventually) so that made the options pretty open.
  • Set aside lots of time.  I messed up with this one this time around!  The pigment ink dried nicely overnight, and the mist would have dried nicely overnight if I had the time.  Your heat gun can speed things up, but at a few minutes for each piece, this was a lot of time I could have used for other activities.
  • Dye ink and gloss medium do not mix. Some of my stenciling was with dye ink, and I tried to put some glossy medium on top.  I loved the way this look, but it caused all of my dye ink to bleed.  (This is why I make a lot!)
  • Be flexible.  My misting worked one day, but not the next.  My pigment ink pad went a little dry.  I improvised by using other ink pads, and adding some stenciling.  It's altered, so it's all good.  It makes each piece unique!
  • Have fun!  I stressed when I couldn't find a lot of examples to guide me, but it is fun to experiment and try something a bit different.
I'll post the items I swapped for later and a few more pictures of my favorite pieces I made.  By the time you read this, I will have done the swap, and can't wait to be inspired by their creativity!

Monday, October 10, 2011

Holiday cards with masked monochromatic panels

Once I get started on a technique, I really like seeing where it can take me.  I had this cool grey paper that I've been hoarding for a while, and thought about using the color blue with some holiday stamps  from the Silent Night collection at Club Scrap.  The stamps have a cool stencil-type look, so I played with these to see what I could make.  The rest of the paper is from the Raku collection at Club Scrap.  Here are some of the cards I came up with:


The Christmas tree stamp is a collage image from Club Scrap that is no longer available.   I really like how these are holiday cards, but they use a fairly non-traditional color scheme.  The Raku kit isn't even for holiday cards - what color combinations have you used for holiday cards that are non-traditional?

If you've been wondering how to set up your tape to do the masking, or want to see how these monochromatic panels are different from the ones I've previously shown, check out my latest tutorial video.


Tuesday, October 04, 2011

100th post!

Wow. When I started blogging, I really had no idea what I was getting into. I am so blessed to have met some wonderful people while blogging, and am incredibly grateful to everyone for their support and encouragement.

Since it's taken me a while to get to 100 posts, you might have missed a few along the way!  Here is a rundown of the all-time top 10 posts on my blog as of today.  Enjoy!

10 Iris folded coffee pot 
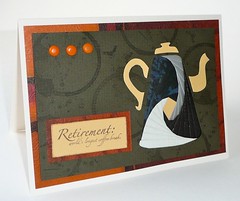
Iris Folding - four cards
I was inspired to try some iris folding after doing a card for a Club Scrap class, and share four of my cards in this post.
9
Organization tip #4: Spellbinders storage plus tutorial
In 2010, I went through a major reorganization of my crafty space. See my tips for organizing spellbinders dies complete with a tutorial.
8
Organization tip #3: Rubber stamp storage
I also shared some organization tips that I use for my rubber stamps!
7 Wedding card with mini-origami dress Wedding cards with origami dresses
Thanks to the All Things Paper blog, I found this great origami book, and played with making wedding cards with white folded dresses.
6
Making Memories Guest Designer
I made this great little travel book using a line of paper from Memory Makers. See a bit of my trip to England in summer 2009.  Of course it took a year to make the book...
5
Tutorial: Make a book with shaped pages
I love using Spellbinders dies, and here I take one of the shapes to make a mini-shaped book
4 Post bound book and card How to make a post bound album
Making a post bound album is surprisingly easy, and they make great gifts.
3
How to make artistic panels
In this post, I debut my youtube channel!  I love making tutorials, but they're sometimes easier when you're taping rather than taking static pictures.  Later, I use these panels to make a fabulous flag book.
2
Pine board book - Caardvarks challenge
I don't participate in many challenges, but this one was something that caught my eye.  You'll actually see some similarities to post #3 - I used some of the same masking techniques here on a bigger scale.
1 Anniversary Cards 
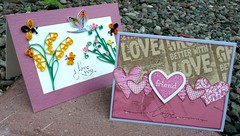
Greeting cards with love - and a giveaway!
This is surprising to me - I know there was a giveaway, but it's long over (2010), and it still ranks in the top ten viewed posts of the last month.  I think love is always a popular topic, and making a card for someone you love is always a great way to spend your time crafting. Can you guess which card my husband made?

Thanks for reading my blog!  Please let me know what you'd like to see in the next 100 posts!

Have a great day!

LinkWithin

Related Posts Plugin for WordPress, Blogger...