Sunday, May 30, 2010

How to make a pocket

I find pockets incredibly useful.  I like to make pockets that we used to find in library books.  I've used them in cards, and also find them handy in books.  In a book, they're great to place a CD with photos in it.  I'm going to use a pocket to cover the back cover of this book.

To start, determine how big you want the pocket.  I want my pocket to be 5.75" wide, and the back of it to be 5" tall.  I want my pocket to be 2.25" tall.  This is a sketch of my finished pocket.


Cut your paper to be 0.75" wider than the width (5.75 + 0.75 = 6.5") and as tall as the pocket plus back (5 + 2.25 = 7.25").  This is a sketch of the piece of paper I'll need to cut, with dashed lines where I'll need to score the paper.


Score your paper at 2.25" (to form the pocket) and at 3/8" on two of the edges.  I like to use a scor-it board.  It makes super accurate scores, and creates a ridge along the score that makes trimming the paper easier.


Trim off the two edges that measure 3/8" x 5" with a craft knife and ruler.  To make folding the pocket easier later, cut the strip just a little wider than 3/8", and remove the strip with an angled (rather than straight) cut.  If you've used a scor-it to make your score line, you can cut just past the edge of the ridge of the score line.


Fold along all remaining score lines and reinforce with a bone folder.  If your pocket doesn't fold the way you'd like, this is your last chance to trim a little bit of paper off to "make it work!"


Apply glue to your short flaps, and place them on the back of the pocket.  This creates a really nice clean pocket with no raw edges to get caught on anything you insert into it.  I often use these pockets to place a CD of the photos that I've used to finish the book so everything is in one place.


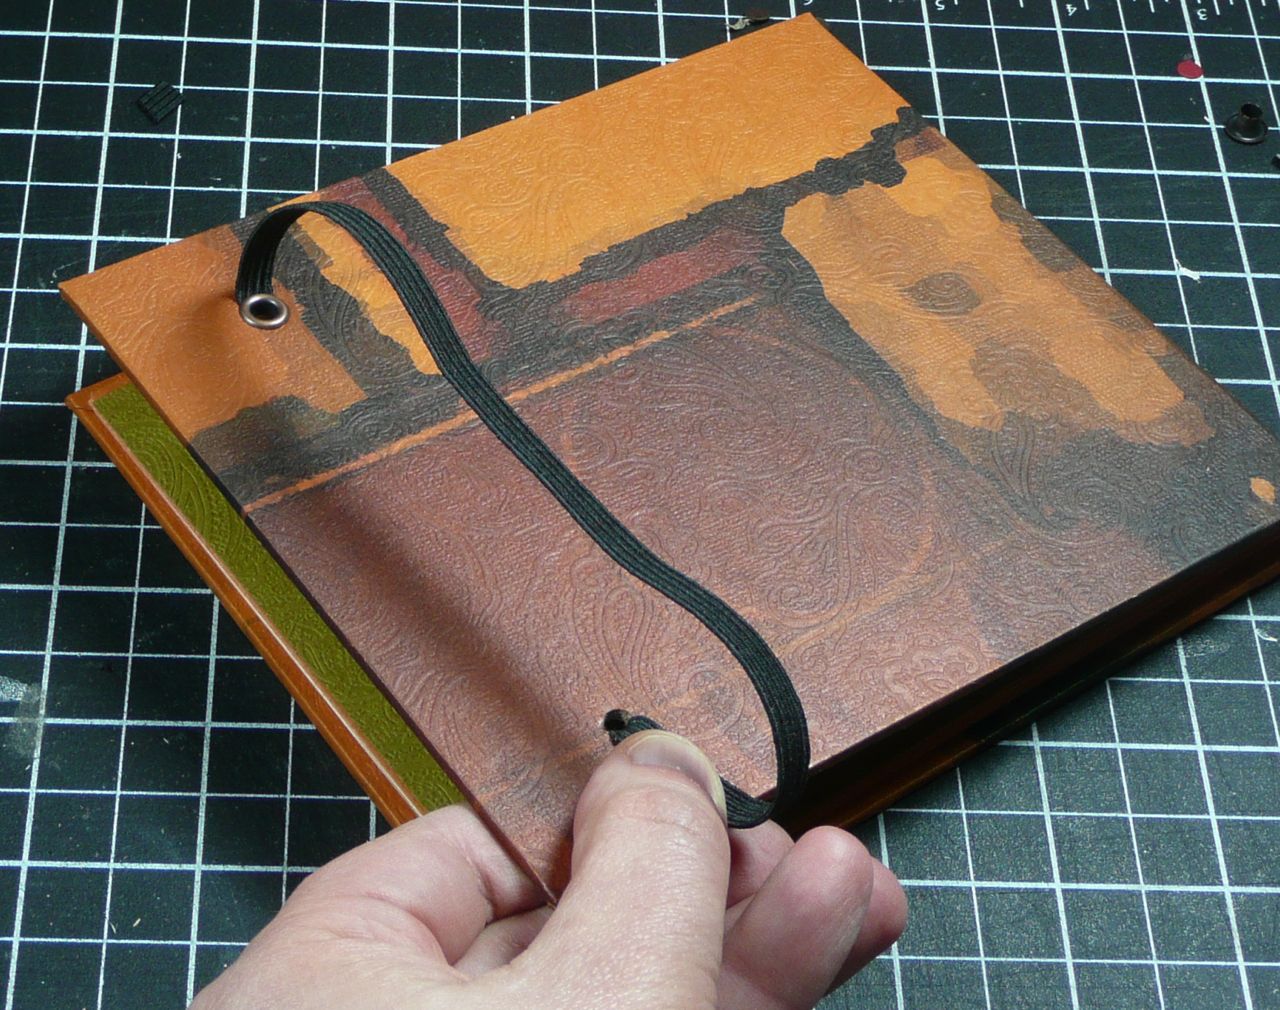
To finish my book, I glued the pocket onto the back cover, and pressed overnight.  Pressing was really important for this book since I had so many ridges created by the eyelets and raw edge of the elastic.

Now, stand back and admire your handy-work!
Book with elastic closure

Book showing the pocket in the back

Thursday, May 20, 2010

Sympathy Card for a Friend

I needed to make a sympathy card for a friend whose mother has passed away.  When I'm not sure what supplies to use, I really like turning to my Club Scrap kits.  Everything coordinates, so with just a little effort, I have a fabulous card.


I was inspired by card highlighted by Hero Arts on their twitter feed earlier this week. I really liked how the card used a floral silhouette image that was embossed.  That inspiration led me to emboss the Queen Anne's Lace image in copper on the green cardstock.  In person, the background is metallic and raised.  Very cool.

I'm not a big fan of dreary cards, so I chose some greens and blues that blend nicely together, but are a little on the brighter side.

To tie my "bow" on the card, I placed my ribbon along the card, and tied a separate piece into a knot.  If you look closely, you'll see that the bow is just attached on top of the ribbon with a glue dot.  Very simple, and takes away some of the frustration I used to have with trying to tie a bow.

Supplies used:
  • Cardstock from Club Scrap (Refresh, Asian Artisan, Painted Desert with Collections print)
  • Queen Anne's Lace stamp from Club Scrap
  • Sentiment from My Sentiments Exactly
  • Ribbon from my stash (it's been on my desk a while, begging me to use it!)
  • Die cut label from a Spellbinders die (Labels Eight)

Monday, May 17, 2010

Making an Elastic Closure for a Book

I love to make elastic closures for books. There is something really neat and tidy about it. You can see some examples of some finished projects using this type of closure on older posts:

I also do an elastic closure on some of my wire notebooks, although I don't see an example on my blog right now.  This makes the notebooks "purse-safe" and ensures that the pages inside won't be damaged while transporting the books.

To start, I draw a pencil line on the back cover of the book, and punch two holes (I use 3/16 in holes, or the larger standard size for eyelets).  I use a crop-a-dile to punch my holes, which allows me to use the punch guide to set a depth for hole.  It's also the only tool I know of that can easily punch holes through thick mat board.  Using the pencil line I've drawn and the punch guide on the crop-a-dile allows for perfect placement of the holes.

Next, thread the elastic through the hole so that the raw edge is on the inside of the book.

Stretch the elastic, and insert an eyelet so that the raw edge of the eyelet is on the same side as the raw edge of the eyelet.  Use the crop-a-dile to set the eyelet.

Wrap the elastic around the book, and trim so that it extends just a bit past back the second hole.  Note that you can see the finished side of the first eyelet at the top of this picture.

Unwrap the elastic, and insert the raw edge as shown.  Set an eyelet so that the raw edge is on the inside of the back cover.  By unwrapping the elastic, you get a lot more play in the elastic which will make this step easer.

The finished elastic on the inside back cover.  Trim the edges of the elastic so that they don't extend past the edges of the book.

The front cover showing the elastic wrapped around the book.

The back cover showing the finished side of the eyelets.

To me, this makes the book more masculine, and a bit cleaner.  When I do this for my wire notebooks, my intent is to also make them "purse" friendly so that that pages inside stay neat and tidy.  All paper is from Club Scrap.

Check back later in the week to see how I cover the back cover and hide the raw edges of eyelets, elastic, and ribbon!

Wednesday, May 05, 2010

More wire notebooks

When I had my supplies out last time to make my wire notebooks, I made several others.  This is the first notebook I made using the stamp stickers.  On this notebook, only the front cover has stickers, and instead of wrapping them around my notebook, I trimmed them flush.  For this notebook, I used a vellum paper underneath the stickers, so I didn't paint the cardboard.  I also left the edges plain, so you can see the difference the inked edges make if you compare the two notebooks.

Bind it all book 1

The next two books used the herringbone technique I learned from Club Scrap. I've used this technique before for books.  This is a great way to use up those little strips of paper. To seal the cover, I covered it with bookbinding glue that was watered down a bit.  The glue coating also gives a little bit of a sheen to the cover.

Bind it all book 5

Bind it all book 4

This book uses a "quadrant" technique that I've used before on cards (experimenting with color and scraptastic snowflakes), and was originally demoed by Club Scrap. I also used some masking on each of the panels, so the images didn't get stamped over. If you're worried about cutting straight edges, covering the join marks with an embellishment is a perfect way to cover the center - just in case things don't quite meet up!

Bind it all book 3

Finally, this is just a simple book with some cardstock and stamping. Initially, I tried to use ribbon as the vertical brown strip, but found out the hard way that ribbon doesn't really punch well with the bind-it-all.

Bind it all book 2

Which book is your favorite?  Let me know if you want to learn more about any of the specific techniques used in these books.  All paper and stamps are from Club Scrap.

Saturday, May 01, 2010

Great Lakes Art Showcase

In my day job, I work at a University.  This means that the end of the school year (now!) is very busy, and I have limited time for crafting.  I am very proud to report, however, that four of my little books are on display at our Great Lakes Art Showcase.  It is a juried art show, and it makes me so very happy to see my work with a lot of other great work.

These have mostly been posted on the blog before, but for a little eye candy, here is my "gallery" of work at the show!

Book3

Book3a

book2

book1

book4

book4a

LinkWithin

Related Posts Plugin for WordPress, Blogger...