Friday, December 27, 2013

Gift bags and thank you cards - A Club Scrap Blog Hop!

Welcome to the Club Scrap blog hop, featuring the Aspen kit.

Around the holidays, I always seem to have at least one or two items that defy wrapping paper, and a box just doesn't seem right.  To the rescue - gift bags!  I used some ribbon from my stash to tie things up - I couldn't bear to use that gorgeous chevron twill just yet.


Of course, ordinary gift bags might not be the right size, so I made my own with paper from the Club Scrap Aspen paper.  These bags are destined for gifts just after Christmas, so the wintery feel is just right without being too spirited. The patterned paper made it easy to make a pretty bag without a lot of work.

To make these custom bags, I measured what I wanted to bag up, and then made a template with some plain paper that was languishing in my drawer (not Club Scrap paper, of course!).  These bags hold bars of homemade soap - who can't use an extra bar or two?  I used the stencil with mists for this bag.

On this bag, I masked each panel (before folding!) and used stamps on the sides and the Aspen stencil on the front and back.  I think I cheated here and used a piece of tan paper from the Chocolate kit...

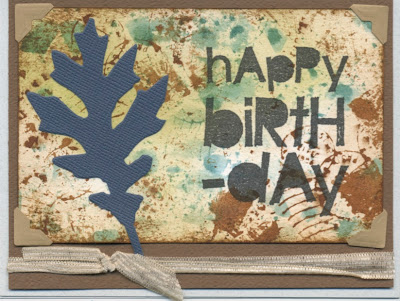
The length I needed was 11" or 12" depending on the number of bars in the bag, but the height was only 8.5".  This left plenty of long strips for crafting, which were perfect for making cards to go with the gifts!  In a "What Would Kay Do?" moment, I added glitter to this cut apart from the kit to make the leaves sparkle.

I make it a habit when crafting now to use up scraps to make other cards when I can.  This is yet another reason why Paul's Christmas card was made from the same scraps....  I used sepia accents on the leaf here to make it shine and have some dimension.

Since I used the green for Paul's card, the leftover strip became this card.  My "thanks" greeting is from a Stampin' Up! stamp and punches to nestle it on the front.

I hope you're enjoying the hop this month and seeing all of the inspiration from our talented artists.  Next on the hop is Deb Weller, and if you get lost or want to start from the beginning, check out the Club Scrap Creates blog.

Wednesday, December 25, 2013

Merry Christmas!

Every year at Christmas, my husband and I exchange cards with one another.  It's fun, and a good way to remember to do some crafting during this busy season.  This year, it's also a sort of preview of the Club Scrap blog hop on Friday, since the card features the papers from the Aspen kit.

We usually go skiing today, and the trails are lined with birch trees, making this paper feel just like our ski trails.  And, since we are obsessed with ice skating, this is the perfect stamp this year.  A pop of red from my table full of scraps gives a happy feel to the card, and some silver pearl pen in the corners gives a little sparkle and dimension.

I hope you and yours have a wonderful holiday season, blessed with happiness, fun, and good health.

Wednesday, October 30, 2013

An Envelope Punch Board File Folder Book - Club Scrap Blog Hop

I hope you're enjoying the Club Scrap blog hop with the Lock & Key kit!

I was inspired this month by a project we made at retreat - a composition book with tabs that stuck outside of the book.

I wondered how I could make this as a stitched book, with the tabs inside the book, like this (sneak peek at the inside!):

I also have to admit that some of the ladies at Retreat didn't think algebra was useful in daily life, so I also took this a bit as a personal challenge to work math into my next project!

The first puzzle to solve was how to use the envelope punch board to evenly space the tabs.  At Retreat, I just did what Karen told me, but I was on my own here.

I wanted to make a six inch book (since our paper is 12 x 12 inches), and have three evenly spaced tabs.  I did a little sketch of what I wanted first and got a formula to express the width of the paper, width of the tabs, and gap between the tabs.


The envelope punch board has 1/8" spacing on the ruler, so I used a spreadsheet to vary the width of the tabs from 1 to 5 inches in 1/8" increments, and played with different amounts of small gaps until I found a combination that yielded a paper width of six inches wide.

If there is interest, I can explain this in a bit more detail later and show different sizes - let me know in the comments!  With a formula and a spreadsheet, there is a lot you can do here to customize your tabs.

I cut paper that was 6" wide and 12" long from my kit.  On the short end, I punched three papers as follows on the short end:

  • For tab 1 - punch at 0" and 1.75"
  • For tab 2 - punch at 2 1/8" and 3 7/8"
  • For tab 3 - punch at 4 1/4" and 6" (or repeat tab 1 and flip the paper)
Trim the pieces you don't want so you end up with one tab on each of three papers.  Score these at 5 3/4" inches.

I wanted the tabs to stick out from the book, the remaining paper was cut to 6" wide and 11 5/8" long and scored in the middle (5 3/4"). 

The outer papers on the book are either a tab piece or a smaller piece of paper, so I created a pocket page for the front and back. (see my previous tutorial)


The book was stitched together using waxed linen thread over ribbons.  (see Tricia's video for an awesome explanation of this technique - starting at about 6:30)


Not being content with just having an awesome book on the inside, I created a niche on the cover to hang some charms and baubles. (see my previous tutorials)

And, here is the finished project.  I might do some more embellishing later, but it is bedtime now!

Hope you enjoy the next stop on the hop - the lovely Debbie Weller always has a fun project showcasing the monthly kit.  If you got lost along the way or want to start out at the beginning, check out Club Scrap's blog for a complete listing of participants.

I can't wait to see what Fire and Ice brings us next month....

Wednesday, September 25, 2013

Take Wing Blog Hop - A dimensional book

Thank you for joining me for the Take Wing blog hop sponsored by Club Scrap.

Each month, their kits inspire me to try new techniques and practice old ones in new ways.  The Take Wing collection inspired me to make a book. This book is a twist on a dimensional book I developed a few years ago (my older posts have full tutorial details).


It uses several layers of bookboard on the cover to create a dimensional niche.  The thick covers and size of the pages reminds me of "big-little" books I used to read.


Three layers of thinner bookboard are used on the cover.  Between the second and third layers I placed punched circles to simulate clouds, and the bird was mounted on a piece of bookboard to lift it above the clouds (but below the surface of the cover of the book).

For the inside pages, I cut a 12 x 12 sheet into 4 x 6 pieces and one 8 x 8 piece for the back cover. On the 4 x 6 pieces, I used a Sizzix die to cut a fancy edge.  This creates a little extra space in the book, and a cool decorative effect.  Because the pages are 4x4, they are perfect for showcasing a photo collection.


What else did I use here?

  • A chicken wire stencil from Crafter's workshop for the textured pattern on the cover
  • I used a brayer with a foam attachment and a Kaledacolor ink pad to create the vibrant stripes
  • The Be Still stamp from Club Scrap for the swirls (I used the wood stamp, but similar swirls are still available on this lovely unmounted sheet)
  • Club Scrap Retreat stencil from 2011(no longer available) for the bird - traced onto shrink plastic first
  • Elements of Style stamp from Stampin' Up! for the swirls on the bird - be sure to use StazOn ink for stamping on shrink plastic. It just works best.

Next on our hop is the fabulous Debbie Weller.  I can't wait to see what she has planned for this month!

If you want to start back at the beginning, or have lost your way, please check out the Club Scrap blog for the full listing of participants.

Wednesday, July 31, 2013

Club Scrap Wisteria Blog Hop - A recipe for quick card making

I hope you're enjoying this month's blog hop sponsored by Club Scrap.

This week, I've been waking up every morning at 5am to go skating at 6am.  Skating school starts next week, and we want to look at least as good as the eight year olds!

So, I need more cards to thank our coaches and the folks involved with the school.  So many people will help us learn and grow next week, and I want to make sure they know how much we appreciate them.

How did I make this card?  I did my own sort of ALSB according to this "formula:"

  1. Cut 12 x 12 papers into 8.5 x 11 - use the wide scraps for stamping greetings and creating card panels that are 3.5 x 4.75.  I used 4 sheets to make 8 cards.
  2. Choose a contrasting color to make a large mat - I used the dark purple in the Wisteria kit.  Cut one 12 x 12 into six 4 x 5.25 mats and create two mats out of a second 12 x 12 sheet.
  3. Use the dark purple to die cut a cool label die cut.
  4. I ran out of smaller mats (3.5 x 4.75), so I found some paper I liked from the Mirror Mirror kit that coordinated.
  5. For any plain paper mats, use a variety of stamps to create your own background.
  6. Use ribbon to embellish with bows.  The Lite kit comes with some gorgeous ribbon, and then I raided my stash when I used that up.
Here are the results.  This card uses one of the patterned papers as a background.  The sentiment is from the Scholarship kit.


This card uses my own collaged background on the light blue from Mirror Mirror.  A variety of stamps are used from Full Circle, Collections, Autumn Garden, and Short Sleeve Pants.  You might notice that I used the pearl pen to create the nifty little dots in the corner of the mat for the sentiment.  Love that little touch!


Finally, I made enough cards so that I would have plenty.  I didn't adhere all of the greetings to the final card. If I don't need this many cards with this sentiment, they can easily be converted to birthday, thank you, or any other type of card!  I'm sure I have another greeting that will fit, and I still have a few scraps of paper left.


Hope you're enjoying the creativity on this month's blog hop! Next on our hop is Wendy Bellino.  If you get lost, or want to start from the beginning, check out Club Scrap Creates.  I wonder what next month's Tribal kit will bring us?

Wednesday, July 10, 2013

More from the Cape Cod kit

So, last month I showed you how I used the cut-aparts from this fabulous Club Scrap kit to make a card.

My original inspiration was the recent engagement of one of my best friends by a lighthouse. The arrival of this kit was perfectly timed!

I made a box to contain my little present.

Open the box, and find a sweet little book.  The lighthouse paper is perfectly sized to create a lovely border - this book is about 4" wide.

Open the book, and you'll find some instructions, a label, and the squash book from the kit.  I decorated the cover of the book with a die cut heart.  I pre-placed some adhesive in the book cover so my friend can adhere the squash book to the cover once she's put some pictures and journaling in there.  I thought that would be easier before adhering.

The book opens up and is just so cute! I think this will be the perfect memento of a memorable day for her and her fiancee.

The final touch is a memorable card. This is one of the other photo mats from the kit, along with ribbon and buttons. I love when I'm sending a package to someone - I can make the card as dimensional as I want!

I made my husband a scrapbook of our engagement as a wedding gift, and these gifts are so special to look back at over the years.  I hope my friend enjoys many happy years with her fiancee, and cherishes all of the memories they create together.

Wednesday, June 26, 2013

Hopes Blog Hop - A card collection

Hopefully as you're reading this, Paul and I are enjoying ice skating morning, noon, and night. I say hopefully for several reasons:
  • We have old knees
  • We have brand new ice skates (we've been warned by many of the terrors ahead)
  • "Hopes" is the Club Scrap kit this month
I also hope that you're enjoying the blog hop this month. I'm a Club Scrap Lite member, and just like last month, the cut-aparts this month inspired me to make a bunch of cards.

I started by cutting two of the tan pieces into 8.5 x 11 pieces of paper.  The wider piece that was left made four tan card panels. The dark brown paper was cut into six 4 x 5.25 panels.


I used the stamps from the Hot Chicks kit to create backgrounds on the panels.  The dotted swoops on the flowers and dotted circles just struck me as coordinating with this kit. I used different combinations of fuchsia, ocean, earth, and tangerine ink on the panels.

Here I used the dandelion stamp.  I didn't like this as much until I put the greeting on it.


I needed one long card for my test application - I'll be dancing the Rhythm Blues, and I have a form to return to the school.  This was also a great opportunity to use my new Envelope Punch Board - how great to be able to make any envelope of any size to fit what I need!


I thought I would use the orange paper at first, but I wanted to throw a bit of a brighter color in to go with the shiny gold paper.  This lovely teal is from the Cyprus kit.


While we're at skating school this week, we'll be working with five different coaches, and the skating community has been very welcoming to us.  I thought that having some cards on hand would be a good idea.

I added some ribbons on some cards, and photo corners on this one. If I had more time, I might have added some dimensional paint, too.


It was nice to have a crafty break before heading on vacation. We're really looking forward to skating, hiking, golfing, and just spending time together. I hope that you are also enjoying the beginning of summer and looking forward to some time together with those you love.

Next on our hop is Wendy Bellino.  If you get lost or just want to start at the beginning, check out the entire group at Club Scrap Creates.

Check back in two weeks to see the second half of my Cape Cod project - my friend loved it!

Tuesday, June 11, 2013

All Things Paper - the release!

It's officially here, and the All Things Paper book is now available in the US.


Here is my little project that I contributed to the book, along with some Nottingham lace to set the mood.

I love little books for traveling, and the sentiment on the cover is one of my favorite Club Scrap stamps.  I was inspired by travel and maps that I'd picked up at a library book sale, and was curious how I could combine all of these items into a mixed-media cover.  At the time, I was taking some online classes, and I was wondering how I could use those techniques in my bookmaking.

This book is really different than a lot of the craft books out there. First off, it focusses on a variety of paper crafts. If you love paper like I do, you will find something that inspires you.  Secondly, the projects are a step above what you usually see in a book.  They range from quilling to box making (I think the box might even stump Kay!) and everything in between.  Finally, the projects themselves are a work of love.  The photography was done by each individual artist, and Ann did a fabulous job making sure everything was picture- and text-perfect.  Ann has a beautiful eye for selecting work, and has compiled a wonderful selection of artists to show their love of paper.

The All Things Paper blog has a giveaway going today through Sunday - check it out!

As soon as I can get my act together, I'll share some of my favorite projects from the book.  Until then, check it out on Amazon and look inside.  Also coming up soon are our annual anniversary cards!  Nine years and counting...

Wednesday, May 29, 2013

Half of the Cape Cod Blog Hop post

Welcome to the next stop on the Club Scrap blog hop for the Cape Cod kit!  I hope you're enjoying all of the inspiration from our crafters.  I absolutely love lighthouses, and navy blue is one of my all time favorite colors. Many a kit with blue paper has been cannibalized for its blue paper.  The other papers sometimes get sad and lonely until they're needed.

Whoops - need to get back on track!

So, what do you do when one of your very best friends gets engaged near a lighthouse?  Well, you use the Cape Cod paper to make her and her intended a fabulous keepsake and card!

Unfortunately, one of the rules of my blog is that the gift receiver gets to look at the present before you do, and she's out of town for a while. Not very good planning on my part!

What to do?  Well, if you're like me, you'll already know that if you're making one project, it's always better to make two.  All of the supplies are out, and you've got the mojo cranking (see my mojo posts from earlier this year for more tips like this!).

The 4 x 6 cut aparts in this kit really inspired me to make cards. My favorite card size is 5 x 7, and these 4 x 6 panels are just perfectly sized.  That empty space on them just screamed "put a greeting right HERE!" So, I did.

The photo mat frames it perfectly (no cutting involved!) and with two sheets of 12 x 12 paper, you're easily set to make two quick cards.

You're probably asking yourself - where is the other card since I'm talking about two?  Well, if your name is Meagan, it will be in the mail to you next week. A little something to look forward to. If your name isn't Meagan, there will be a blog post just as soon as she calls me to dish all the details on her engagement!

In other news, I just got an advance copy of the All Things Paper book. I'm a bit biased since I'm in it (and my project features the best stamps in the whole world - from Club Scrap!), but it is jaw droppingly beautiful.  There are 20 fabulous projects in there, all with fabulous step-by-step instructions. It's a large paperback, with each page a full-color glossy letter sized paper. It will officially be out on June 11th, so not too much longer to wait.

I do hope you'll stop by later to see what else I made from the lovely Cape Cod kit, and I hope you enjoy the next stop on our blog hop - DebDuzScrappin' - Deb Weller's fabulous blog.  If you got lost along the way or just want to start at the beginning, check our the Club Scrap Creates blog for a full directory.

Saturday, May 04, 2013

A mini-book for National Scrapbooking Day | Club Scrap Blog Hop

I hope you're enjoying the Club Scrap [Inter]National Scrapbook Day blog hop.  Thanks for joining in!

I think some people forget how broad the term scrapbooking is. To me, scrapbooking is just a way of capturing moments and sharing them with those we love. It could be a home decor piece, an album full of layouts or a mini book. It's not always about making pages (although that's fun, too!).

This book starts with a box - I couldn't bear to cut into my Club Scrap paper to make this box, but doesn't it look lovely even if it isn't Club Scrap paper?

This book is from the Club Scrap 2011 retreat.  I finished it recently to give as a gift. It looks like I forgot to take a picture of it all closed up. It has a sweet elastic closure, and we used a lot of different techniques to distress the cover.

I used a rolodex die to create a little cover page for each section, used the index prints from my photo order as embellishments.  I think they are so sweet.

Each section has a blue cover.  I used my Sizzix to emboss the covers, and decorated with strips of coordinating paper (from Gimme a Ring) and stamped images (from Natural Resources).

Each page simply had stamped edges, and a photo. Easy peasy, as Jac would say.  :)

No gift is complete without a little love in it.

Minibooks make great gifts. My mom and dad loved this book, and I hope they fondly remember the time we spent together when they look at it. To me, scrapbooking is all about preserving memories. I hope you find some time to preserve yours - but not until you check out the next stop on this hop, Deb at DebDuzScrappin. If you missed anyone, or got lost along the way, please visit Club Scrap Creates for the whole list of bloggers.

Monday, April 29, 2013

More collaged backgrounds

Before I made my misted backgrounds last week, I experimented a bit with my new distress stains to see what kinds of effects those would yield.

I started by applying the stain through stencils, and then applied stain to stamps.  I used broken china and vintage photo here.  I also used the tattered leaves die to make some leaves for my cards.

On this card, I started with the same harlequin stencil, but then I used a CS stencil with ink and the Postcards from Paris stamps with ink to add a bit more definition in the background.  The blue panel was hand stamped with the same Postcards from Paris stamps in white pigment ink.

I'm wondering if I can get some of the same effects with watercolors.  I love the stains, but I already have lots of watercolors on hand.  If only I had more time to play...

Be sure to some back on May 4th.  I'll be sharing a mini-book I finished recently as part of the Club Scrap blog hop for National Scrapbook Day.  Mini-books make great gifts, and Mother's and Father's Day are closer than you think!

Wednesday, April 24, 2013

Misted Collaged Backgrounds | Club Scrap April 2013 Blog Hop

Welcome to the April Club Scrap blog hop, featuring the Spring Chorus kit.  I hope you enjoyed Roni's project and are looking forward to more inspiration for card making!

The blues and greens of this kit really inspired me to create some misted backgrounds with lots of water and stamps featuring natural images.

These cards are always unique. No two are ever quite the same.  I was also inspired by Tricia's art orphans, and Christine experimenting with mix'd media ink to play with my inks and stamps.

It's easier to show you how I made these, so I made a little video sharing my techniques and thoughts with you.
I hope this inspires you to "think spring" and use your mists to create some ephemeral backgrounds.  I still have three feet of snow on the ground in my yard, so I need all the help I can get with getting into the spring spirit!

Who can resist a card with a saying like this?

I hope you're enjoying the Club Scrap Blog Hop.  Next in our hop is the talented Deb at DebDuzScrappin.  If you missed anyone, or got lost along the way, please visit Club Scrap for the whole list of bloggers.

Supply list:
  • White panels for misting from the Steppin' Out! kit - no longer available, but substitute any thick white paper of your choice.
  • All other paper from the Spring Chorus collection
  • Memories Mist by Stewart Superior - Blueberry Shake and Wheatgrass
  • Hybrid ink from Club Scrap
  • Just Dandy stamps from Club Scrap, along with assorted sentiments

LinkWithin

Related Posts Plugin for WordPress, Blogger...