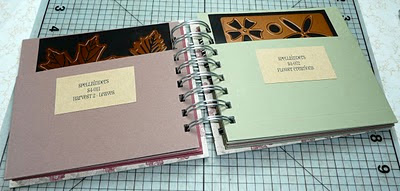
First, I got all my dies out, and decided which dies would fit in which book. This book is all about shapes - leaves, flowers, santa, bridge, etc. I'll be using a bind-it-all, cardstock, scor-it, patterned paper, a cutting mat, and a craft knife for my initial supplies.
To make the pockets, I take a 8.5 x 11 piece of paper and score it at 5.5" with the paper in a landscape orientation.
Rotate the paper 90 degrees so it is in a portrait orientation, and score at 5".
Fold the long edge up to form the pocket part. Reinforce the fold with a bone folder.
Fold the paper on the other score line. The folded edge will be on the outside of the book, while the open edge will be the binding edge.
Next, I make the covers. Trim two pieces of chipboard to 5.75 x 5.25" using a craft knife, and cutting mat. I choose thinner chipboard for this project - you'll be covering it with patterned paper and punching holes in it later.
Trim a 12 x 12 piece of paper into two 6 x 12 pieces. Run each piece through a xyron machine. I also like to use a dry adhesive because I get instant gratification and edge-to-edge adhesive with a xyron. I've used some of the edge to also xyron labels for my pockets.
Place the front of each cover on the sticky part of the paper. Trim with a craft knife. Since the cover is chipboard, you don't need a ruler if you're careful with trimming.
Flip the covers over, place on the sticky side of the other sheet of paper and trim.
Punch holes in the cover with the bind-it-all, and punch holes in the open side of the pocket pages.
Inside the pockets, I use my magnet cartridge from my xyron to laminate a small label. The magnet on the xyron is strong enough to hold the spellbinders dies, but not super strong. The pocket makes sure that any parts that fall out will remain close by.
Bind the cover and pockets together (see my earlier tutorial), put a label on each pocket, and slip the magnet inserts in the pockets. If you like, create a few empty pockets at the end to accommodate future purchases. You can also reopen the binding and insert more pages. If you're careful (and not too picky about the coil being "perfect"), you can reuse the coil. Otherwise, you can still just use a new coil to rebind the book.
My organization series is almost done. I'll share some tips in my last post about how I'm going to work to keep this up and not fall back into bad habits. I'd love to hear other ways of organizing dies. What are your favorite methods?


Brilliant Deb...thanks so much for remembering. I'd forgotten, LOL.
ReplyDeleteVery good job on this.
ReplyDeleteOOOHhh... are you going to have some of these organizational binders for sale at the shows? Then perhaps I can make some of my own!
ReplyDeleteI could do a custom order, but I don't typically make these for selling. Mostly because they're made with scraps I have around the house!
ReplyDeleteAwesome I was just spending some time looking at your blog and finally found this -it's still 2011 ;)- and I do love making these books so will put them to use with my spellbinders :)
ReplyDelete