Showing posts with label club scrap. Show all posts

Sunday, May 23, 2021

Studio progress - cabinets are installed

Seriously, this project has taken longer than our kitchen remodel last year, so I am starting to get antsy to get back into my real space!  The pandemic is affecting receiving some of our materials, and everyone is remodeling their houses at the same time, so lots of services are backed up for weeks. That being said, there is a lot of progress to show.

First, the upper cabinets were installed.


Then, the base cabinets and doors were installed.


Then, we got lights! This shows the can lights and the under-cabinet lights on.  I was also able to start putting a few things in the room - mostly to clean up the rest of the house!

A different view showing the patio door, and I added my bookpress in it's real place.

Finally, we installed the TV mount and got the TV on the wall.  My desk will face this TV, and I can use it to project my laptop or watch videos. I think the next Club Scrap unboxing will be extra nice on this TV!

Next up is flooring, countertops, and trim. Fingers crossed that that won't take too long.  We have the carpet installers scheduled, and the rest of the stuff should be ready to install.  We're also re-doing our laundry room (next door) at the same time, so it's a lot of chaos in the house, but will be well worth it when it's completed.

Thursday, October 11, 2018

An autumn tag tutorial

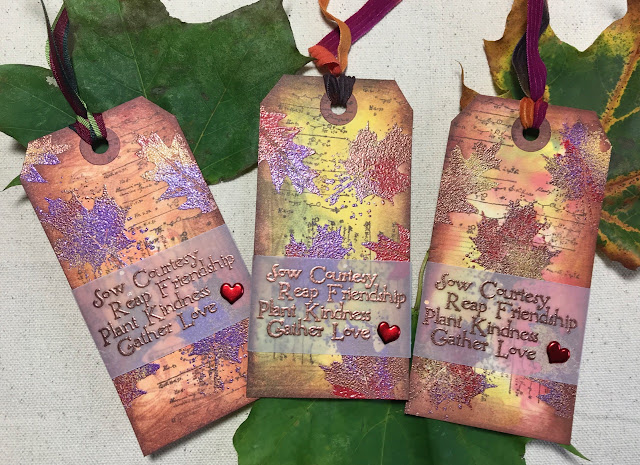
For our annual Club Scrap retreat, we were asked to create six tags to swap with the group.  It's a fun way to meet people and share techniques.  I took a few pictures along the way to show you how I created this tag.


I wanted embossed leaves of different colors to mimic the beauty of the fall leaves where I live.  I used Autumn Splendor (October 2004) stamps to random leaves with versamark ink.  One of the stamps had some spots around it, which I thought would add a little "noise" and cover up any stray embossing powder that might stick to the tag. I put each color of embossing powder on a separate piece of paper.


I sprinkled each color on the tag, shaking off after each color. You want to sprinkle sort of randomly and lightly - you don't want to try and coat the whole tag with each color.  I started with purple (Paul's idea!) in this tag.

Next I did yellow.

Then I did a red.  I tried to make sure there was a little blank space left over on each, but as long as you lightly sprinkle, there will always be a few spots that are open.

Finally, I generously coated the tag with a copper embossing powder.  I wanted to make sure the entire image was embossed.

This is the result after embossing.  The leaves all look a little different on this tag, and on every tag.  I really liked how this looks!

Next, I used ash ink from Club Scrap to stamp this stitched image from Wild, Wild, West (October 2005).

I then used distress inks (mustard seed, barn door, and peeled paint) to apply color to the entire tag.  I used different ways of doing this on all of the tags.  My favorite was to spray the tag lightly with water and swipe through the colors.  At this point, I have to admit that I didn't love all of the tags.  Some of the colors were quite dark, and the leaves disappeared a bit, but I kept on going!  Ash ink is supposed to be waterproof, but I did see a little bleeding on some of the tags - there was a lot of water here!  I liked this look.

After all of the tags had dried, I used this noise stamp from Science (September 2005) in Earth ink to create more texture. After stamping, I wiped any ink off of the embossed images.

After that, I used an ink applicator to ink the edges in earth. After doing this tag, I did switch to mahogany ink. I liked both, but the mahogany was a bit richer.

 To finish the tags off, I stamped a sentiment from Autumn Splendor on vellum paper, and taped it on the back.  I did put all of the tags in my book press overnight to flatten them out.  I then added a heart brad, and some ribbon or fiber to complete the tags.  I just love how no tag is identical.  I've shown a few of them below.


I hope my swap partners love receiving these as much I enjoyed making them!

Saturday, June 23, 2018

Suminagashi Paper Marbling - Club Scrap Challenge

This month, Julie challenged us to try different marbling techniques. I had taken a class on suminagashi marbling, and had been wanting to try this again.  The nice thing about this this technique is that it is water based which leads to easy clean up and minimal supplies are needed.  I'll link to some supplies and resources at the end of this post.

After playing for a while, I had many sheets to make into cards! I liked using watercolor paper and newsprint paper (no printing) for this technique best.  Mulberry paper also works well, but if it's deeply colored, the pale marbling might not show well.

I decided to have some fun just by using them as backgrounds to start.  I decided to use the June small die of the month from Spellbinders to create some cupcakes and candles. This is a standard 4.25 x 5.5 card so you can see the scale of the cupcake.

I thought the cupcake was a little large, so I switched to just using the candles on a few cards.


Finally, I used a punch to create some shapes for layering and had some fun with washi tape and other sparkly things.


Supplies and resources

  • Sumingashi paints were from a set that has enough colors and paints to last a long time.  I mixed some of them to create different blues and greens in my samples.
  • Sumi brushes (Club Scrap members may still have one from the Pure & Simple kit) are the traditional brush to use - look for smaller ones since you don't want a lot of paint in your brush.
  • Some paper and embellishments were from the Paradise kit
  • Ruth Bleakley has a nice post on trouble shooting sumingashi marbling
  • Washi, die cut papers and sentiment stamp are from my Club Scrap stash of papers.

Sunday, April 15, 2018

Shibori Technique Challenge

Julie posted a great tutorial on a technique to make shibori-style prints from tissue paper.  This technique is inspired by Club Scrap's April kit - Shibori.  I tried it out today and made these lovely cards.

The blue and purple were some spray mists that I love.  I wasn't completely happy with the color coverage on these, but by stamping in colors and black ink, I made some great backgrounds for cards.  I used my xyron to cover a piece of white card stock with adhesive and laid that on top of the tissue paper to give the tissue paper some stability for stamping.


I had a lot of fun with this technique, and made several more tissue paper strips after this.  I altered Julie's technique by spraying my tissue paper with water first before applying the sprays.  I hope to share more cards soon!

Friday, March 03, 2017

Succulents card - Club Scrap

I created this card using the cut aparts from the Succulents kit, and a card base from Paper Wishes. These bases are great for creating intricate cards because they take all of the work out of measuring.  In a bit of serendipity, the "Happy Birthday" greeting perfectly covers the inside greeting when the card is flat.


Thursday, February 16, 2017

Valentine's Day - Cards for 2017

My husband and I have been a bit remiss for some holidays lately, but we revived our tradition of making cards for each other on Valentine's Day this year.

My husband is a master quiller, and created this lovely bouquet of spring flowers.  This year, it even has a woven basket!  I've recently cleaned the craft room, so he was able to find everything he needed this year without frustration...  I'll definitely keep it clean, it if keeps him giving me gorgeous cards!

My card uses a fancy fold to make a step card.  I'm not quite this patient, however, and I used a card base that was pre-cut and scored to make this beauty.  The design challenge this month at Club Scrap is fancy folded cards, so I was inspired to use these die-cut cards from Hot off the Press to easily make my card.  My paper and stamps are all from vintage Club Scrap kits, and I experimented with a little foil on the heart.

I hope you had a lovely Valentine's Day - spring is just around the corner!


Saturday, April 30, 2016

Suminagashi and Dahlia - marbled paper with stencils

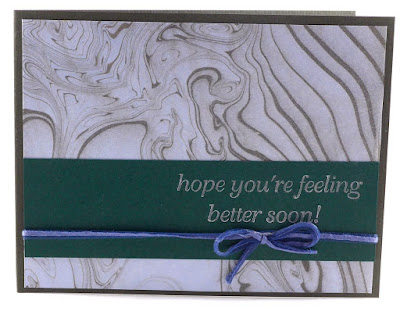
Last weekend, I took a fabulous art class at the Copper Country Community Arts Center with visiting artist Pamela Olson.  She taught us the art of suminagashi - a japanese form of paper marbling.  At the end of the weekend, we were left with some fabulous pieces of marbled paper, and I decided to make cards!

This first card shows off the marbling. In suminagashi, the marbling is typically only black; here I've used two to create stripes of blue and black.


Because you are working on water with this marbling technique, the colors are very subtle, and you don't get the defined lines and shapes you might be familiar with in traditional marbled papers.  Here, I've used some papers in a grid pattern.


 Finally, I decided to see if I could colorize the paper.  I used my color bursts (I love the new Caribbean Brights set!) and saturated the paper with color.  Probably a little too much color...  Then, I used the Club Scrap Dahlia stencil with gesso died pink to create a bright flower.  I tried this technique with a molding paste, but was disappointed to learn it dried translucent.  I used some classic papers from Stratosphere and punches to finish off the card.

If you're interested in trying suminagashi, it's fun, and easy to clean up since it's water based! This kit has some colors to get you started, and sumi brushes are a great tool to use for applying the color.  If you remember back to the Pure and Simple kit, we received one then, or you can find them on Amazon.  Below is a video illustrating their basic use.

Wednesday, December 30, 2015

Navigation blog hop - A junk journal for traveling

I'm not sure if this is a junk journal, hand stitched book, or something else, but my internet searching for inspiration turned up a lot of posts titled "junk journal," so let's call it that! Thank you for joining me for the Club Scrap blog hop featuring the Navigation kit.  If you picked up my post in the middle, check out the full list on Club Scrap Creates.

When I last went to England, I took a "smash" like journal with me, and had a lot of fun writing and stashing memorabilia in it.  Karen's project at Club Scrap Retreat also inspired me to create my own book with space for storing stuff and writing my memories.  If you want to see how it's made, check out my picture tutorial.  If you want to see more of the inside of the book, skip to the bottom.


 I started by cutting two covers (8.75" x 5 5 5/8") and one spine piece (8.75" x 1 5/8").


 On the spine piece, I pierced 3 holes in a line - 7/8" from the top and bottom and in the middle.  Since the spine piece was narrow, I rested my ruler on the covers so it would be easier to balance.


 The outer holes were 0.25" from the edge of the spine and the inner holes were spaced 3/8" from the outer holes. You can see a template on the left, with the pieced spine on the right. The circles on the template were where I pierced.

 I glued the spine piece to a piece of the green paper from Navigations that measured 5 1/8" x 10.25".  Don't forget to repierce the holes!

The covers were glued to the dark green paper so there is a 1.5" overhang, and then the remainder of the covers had a light green piece of card stock (4.75" x 10.25"). The corners were clipped, and wrapped around to form the basis of the cover.

(At this point, if you want a ribbon closure for your book, I recommend gluing it to the board now - I forgot!!)  I covered the inside with the fabulous map paper on the left side, and created a pocket for the right side.  The pocket piece is 12" tall, with a score at 8.5".  The pocket piece is 5 1/8" wide, with 3/4" flaps on the bottom (below the score line).

Fold the bottom up and the flaps around the back to form the perfect pocket. If I was Kay Williamson, I would have stamped that empty spot on the bottom before assembling to create the perfect embellishment.

Here is what the inside of the cover looks like when complete - I pressed this overnight and repierced the holes in the spine.

I then created 4 signatures to stitch into my book.  There is nothing magical about these - to make it simple, you could just use 8.5 x 11" paper folded in half.  Mine have several different pocket constructions, and had the following four pages each:
  • Outside page: 8.5 x 11 piece of paper folded in half
  • Large pocket page: 10.75 x 12" piece of paper.  Score at 8.5 and fold up the skinny piece.  Fold the 10.75 x 8.5" piece of paper in half
  • Inside page: 8.5 x 10.75 piece of paper folded in half
  • Inside pocket: create a pocket from a 5.75 x 10.75 piece of paper.  Create a 0.75" flap on two edges, and along the long edge, remove a 5 x 0.75" strip so the 0.75" flaps will fold around the smaller piece to form a pocket
From one outside page, pierce a hole in the middle and 0.75" from the top and bottom on the score line.  Use this as a template to pierce holes in all of the other pages, noting that the inside pocket pages are shorter than the regular pages.

Each signature looked like this (burgundy is outside page; gold is large pocket page; kraft is inside page; brown is inside pocket)- note how the inside pocket page is not assembled at this point (the tabs on the inside pocket page have the printing on them - I trimmed a corner off before stitching to make it easier to put things in and out of the pocket).

Each signature was stitched using a pamphlet stitch. Starting from the middle hole, I stitched from inside the pocket to the outside of the book.  Then, I stitched from the top hole into the book, back out through the middle hole, and then back in through the bottom hole. I tied the tails of waxed linen thread together to secure the signature.  Repeat for each line, making sure you use one vertical line of holes each time and that the pockets are facing up!

When you're done with one signature, trim the tails of thread, and attach the flaps to make a pocket - a nifty side effect of this design is that your thread is hidden.


At the end, your book will look like this on the spine:

And like this on the edge - see how the four signatures are stitched, and there is a nice gap between them?

The Navigation Lite kit doesn't have enough paper to make all of inside pages, and I didn't want to cut all of it down to 8.5 x 11 to make the book.  Other papers were from To You With Love, Equestrian, Comfort Zone, and Academy.  Inside the front cover, I used Club Scrap gold pigment ink to create my own collaged background with a variety of classic stamps (London Calling, All Aboard, Sail Away, and Postcards from Paris) and incorporated the long cut apart into my own unique cover page.

The book looks pretty impressive when fanned out - I can't wait to fill it!

The large pocket pages are the perfect home for the envelopes from the Navigation kit (oops - forgot to show one in the book here!).

The inside pocket had a slash cut in them so I could easily place a large "tag" for later embellishment or journaling. Cut the slash before stitching.


The back pocket holds a Navigation envelope with a variety of cut aparts from this and other kits.

Since I forgot to attach my ribbon in the usual place, I put a cut apart from the Orient Express kit on the back to attach the green ribbon from the Navigation Lite kit.

I added some buttons from the Transformations kit on the spine to add some bling to the spine. The original plan was to tie together all of the exposed linen thread, but I didn't leave enough slack to do that.

I really love how the colors and themes of this month's kit blended beautifully with so many old and new kits.  I hope you enjoy the next stop on our hop - Marya Kaszubinski at A Notebook Novel always has something great to share!

LinkWithin

Related Posts Plugin for WordPress, Blogger...