
To start, you'll need cardstock to stamp on, stamps of your choice, ink, a piece of scratch paper (not shown) and a foam applicator (I like the handle

Tear the piece of scratch paper (the thinner the better) in half. Use the removable adhesive to adhere the torn paper to your cardstock.

Stamp a variety of images, being sure to stamp some of the images onto the scratch paper.

I like to use a stippling brush to apply a little bit of color to the exposed strip of cardstock. I like the Color Duster stippling brushes by Judikins. They fit nicely in your hand and you have a lot of control with them.

For the last step step, I use a foam applicator to pull darker color (with the same ink pad) onto the edge. I find it works best if you start on the scratch paper and pull onto the cardstock. Use a light hand and build up the color gradually. You can pull back (gently!) the scratch paper to check how much color you're adding.

This is the finished piece. The torn edge makes it look really difficult, but it's easy!

I just added a ribbon and sentiment, and this card is ready to go.

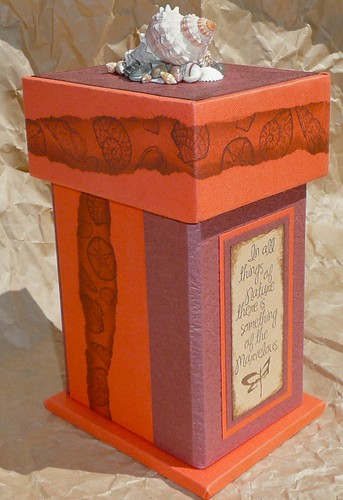
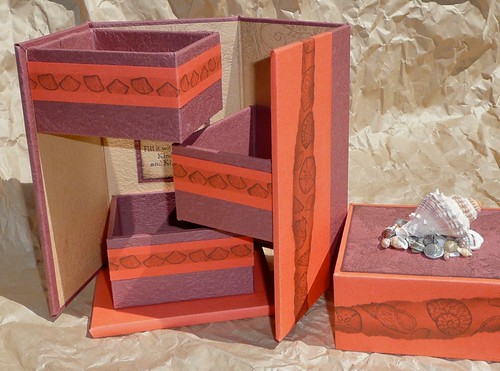
I used the same technique to decorate some paper I used to create this Interlock-a-box project, available from Club Scrap. To personalize mine, I switched some papers and created the boxes on the inside a different way. I also added quotes on the outside for embellishments.
On the inside, I created boxes and used the masking technique with a straight edge paper. This created a "faux" ribbon around the boxes.
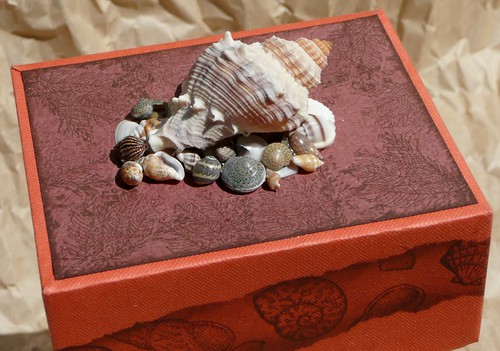
On the top, I glued some small shells using E6000 glue, and then glued a larger shell on top.
My favorite products that I've used in this post (besides the paper from Club Scrap!):
Seriously...you maket he greatest stuff! Thanks for the tutorial; I just bought some stamps for the first time and have not idea what to do with them....now I know :)
ReplyDeleteVery cool projects, Deb! I love all the boxes, so intricate, and the shells on top are the perfect touch.
ReplyDeleteBeautiful!!! I can't believe that such beautiful results are so easy! Thank you for sharing!!
ReplyDeleteDebra, what a clever tutorial! And the outcome is so beautiful! Thanks for this peek into your creative techniques!
ReplyDelete